facebook_pixel ↓
 

  • Blog
  • Stampin’ Up! Online Store
  • On Line Classes
  • View Our Catalogues
  • Event Calendar
  • Cool Tool Tip Videos
  • Questions and Answers
  • Simply With Heart – Etsy Store
  • Gift Certificates
Home » Blog << 1 2 3 4 5 6 … 78 79 >>

Post navigation

← Older posts
Newer posts →

Handmade Pine Boughs Christmas Card Celebrates a Tradition

Posted on November 17, 2016 by Karen GilbertNovember 17, 2016  

Handmade Pine Boughs Christmas Card

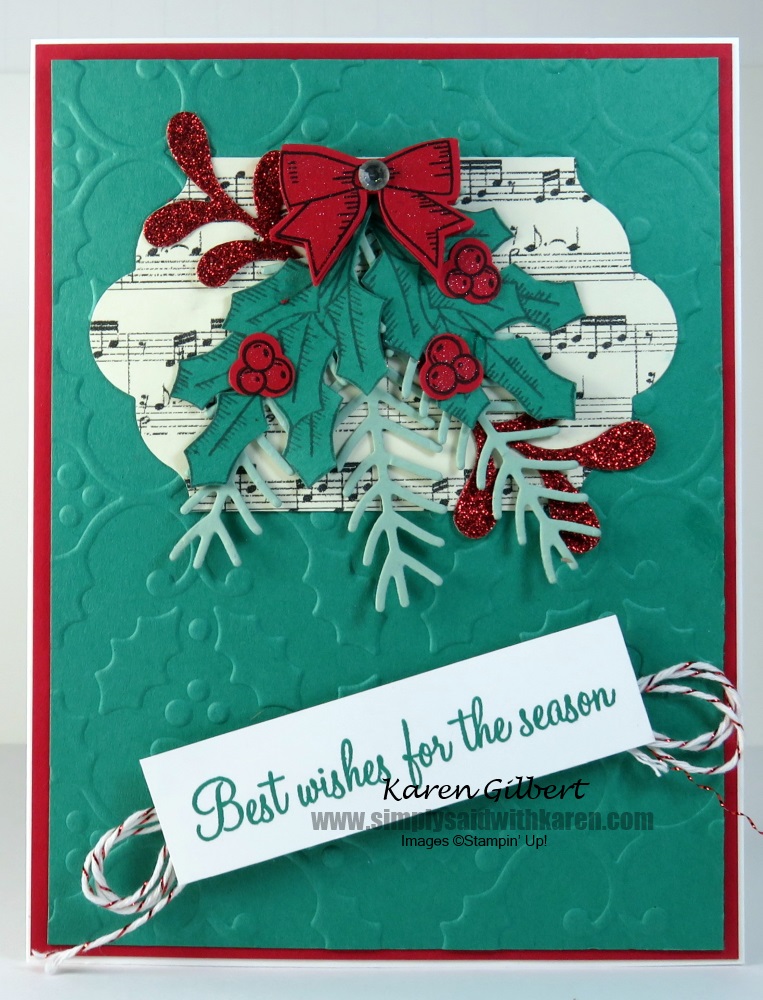
Christmas in Canada is about the tradition and a handmade pine boughs Christmas card meets that  tradition. Most decorated homes will have at least one pine bough decoration. When I was a child, I remember going out in the woods, knee deep in snow and cutting the Christmas tree down.  There is something about the smell of a  freshly cut tree.  Of course, today, going to the woods and cutting down your own tree does not happen often. So why not create you own sense of tradition and use Stampin’ Up!’s Christmas Pines stamp set and the matching Pretty Pines Thinlits to create a Christmas card.
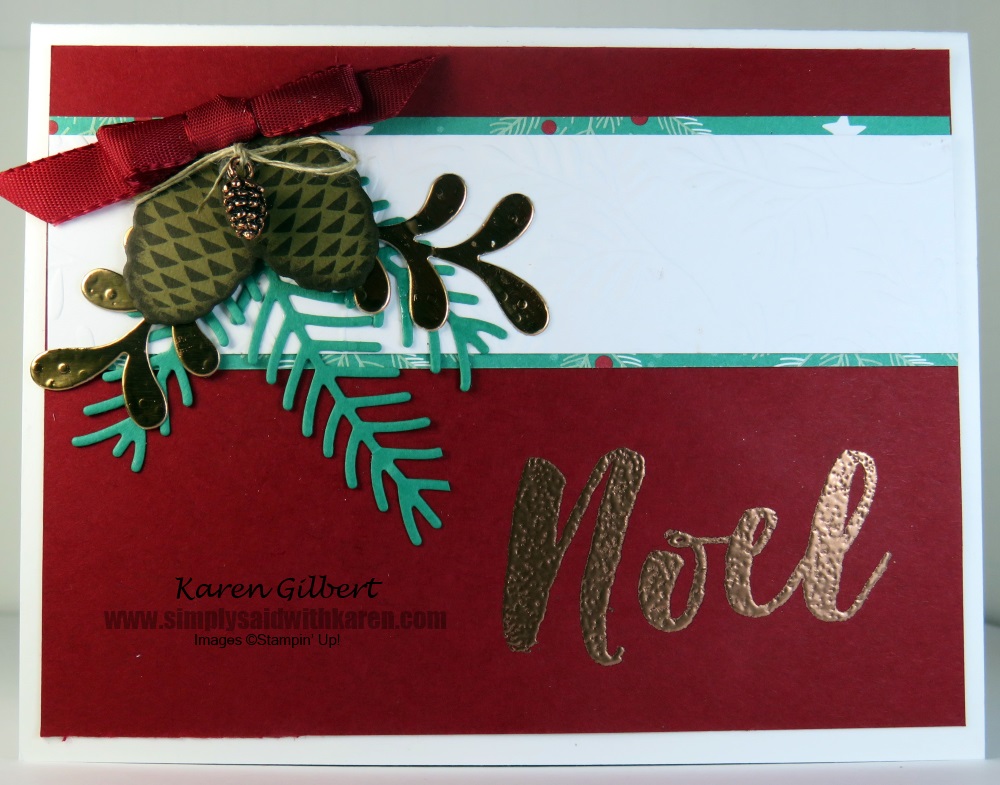
 Handmade pine boughs christmas card

Recipe

Stamps: Christmas Pines. Ink/Markers: Soft Suede, VersaMark. Paper: Whisper White, Cherry Cobbler, Emerald Envy, Soft Suede, Copper Foil, Fancy Frost Specialty DSP, Presents and Pinecones DSP. Accessories: Big Shot, Pretty Pines Thinlits, Copper Embossing Powder, 3/8” Silky Taffeta Ribbon Combo Pack (Cherry Cobbler), Mini Pinecones. Unfortunately, you cannot see the intricate embossing on the strip of Fancy Frost Specialty DSP.   This is beautiful paper and I chose to use the white.  However, you can add colour by sponging on ink, using a spritzer and spraying on ink, and/or brayering ink on the paper.  These techniques bring out the design in the paper. The copper embossing powder and copper foil paper adds just the right touch of shine and glitz.   Copper is one of the go to metals for the year. While you may not be able to go to the woods and cut down your own pine boughs or Christmas Tree, you can bring these traditional elements into you crafts.  There a lot of people interested in the natural elements of Christmas.  If you want additional inspiration, use this LINK.  Create your own handmade pine boughs Christmas Card and celebrate tradition.

Product List

Christmas Pines Photopolymer Bundle
[143496]
Soft Suede Classic Stampin' Pad
Soft Suede Classic Stampin’ Pad
[126978]
Versamark Pad
Versamark Pad
[102283]
Whisper White 8-1/2" X 11" Card Stock
Whisper White 8-1/2″ X 11″ Card Stock
[100730]
Cherry Cobbler 8-1/2" X 11" Card Stock
Cherry Cobbler 8-1/2″ X 11″ Card Stock
[119685]
Emerald Envy 8-1/2" X 11" Cardstock
Emerald Envy 8-1/2″ X 11″ Cardstock
[141415]
Soft Suede 8-1/2" X 11" Card Stock
Soft Suede 8-1/2″ X 11″ Card Stock
[115318]
Fancy Frost Specialty Designer Series Paper
[142014]
Presents & Pinecones Designer Series Paper
[141986]
Copper Foil Sheets
Copper Foil Sheets
[142020]
Copper Stampin' Emboss Powder
Copper Stampin’ Emboss Powder
[141636]
3/8" (1 Cm) Ribbon Silky Taffeta Combo Pack
3/8″ (1 Cm) Ribbon Silky Taffeta Combo Pack
[141989]
Mini Pinecones
Mini Pinecones
[141990]
Did you like this post? Say thanks by sharing it
Pin It
Posted in Cards, Christmas, Techniques | Tagged Big Shot, Christmas, Embossing, occasions, Stampin Up, su | Leave a Reply

Stamping Craft Mistakes – Opportunity to Learn And Improve

Posted on November 11, 2016 by Karen GilbertNovember 11, 2016  

Stamping Craft Mistakes

I consider my stamping craft mistakes opportunities to learn and improve my stamping capabilities. This card does have a mistake and I will tell you about it and how I will improve on the next stamping project. I created a shaker card using the Jar of Love stamp set and the matching Everyday Jars Framelits.  This stamp set has very cute sayings and the one I chose is “Best Fishes”, so of course I there is a  fish inside the jar and the blue beads depict the water. First, let me give you some highlights of this card. The stamps and matching framelits really lend themselves to making shaker cards.  I love to create shaker cards as it adds an element of surprise for the person who receives it. The blue shakers inside the card are beads that Stampin’ Up! carried in years gone by.  So you just never know when supplies that you have had for a long time will come in handy.  As you notice, the beads are lying up the side of the jar instead of resting in the bottom as the other beads.

Opportunity to Learn

So why did this happen? Foam Adhesives Strips were a new catalogue product this year. They can be used for 3-D items or where you need to pop- up a product like the Window Sheets. Unfortunately, some of the sticky from the adhesive was exposed which caused the beads to float to the side of the jar when I shook the card. Therefore, this is what I learned because of this mistake.  After applying the Foam Adhesive Strips around the outline of a framelit, take a Q-tip, pounce it on the Embossing Buddy and swipe the inside of the adhesive strips.  Be careful not to get any of the powder from the Embossing Buddy on the side that will be stuck to the Window Sheets or cardstock.  If you do, then the layers will not stick together. Stamping Craft Mistakes

Recipe

Stamps: Jar of Love. Ink/Markers: Flirty Flamingo. Paper: Whisper White, Dapper Denim, 2016-18 In Color DSP Stack, Window Sheets. Accessories: Big Shot, Everyday Jars Framelits, Flirty Flamingo 3/8” Ruched Ribbon ,Foam Adhesive Strips,  Blue Beads. To see another post using the Jar of Love Stamp set and coordinating framelits, use this LINK. So, you make stamping craft mistakes, think of it as opportunities to learn and improve. Good luck!

Product List

Jar Of Love Photopolymer Bundle
[142342]
Flirty Flamingo Classic Stampin' Pad
Flirty Flamingo Classic Stampin’ Pad
[141397]
Whisper White 8-1/2" X 11" Card Stock
Whisper White 8-1/2″ X 11″ Card Stock
[100730]
Dapper Denim 8-1/2" X 11" Cardstock
Dapper Denim 8-1/2″ X 11″ Cardstock
[141414]
2016-2018 In Color Designer Series Paper Stack
[141408]
Window Sheets
Window Sheets
[142314]
Flirty Flamingo 3/8" (1 Cm) Ruched Ribbon
Flirty Flamingo 3/8″ (1 Cm) Ruched Ribbon
[141426]
Foam Adhesive Strips
[141825]
Did you like this post? Say thanks by sharing it
Pin It
Posted in Birthday, Cards, Masculine, Occasion Cards | Tagged Framelits, Photopolymar Stamps, Stampin Up, stampingup, su, Techniques | Leave a Reply

Mason Jars Handmade Greeting Cards – Will the Trend Last

Posted on November 7, 2016 by Karen GilbertNovember 7, 2016  

Mason Jars Handmade Greeting Cards

Have you seen the Mason Jars Handmade Greeting Cards?  Glass Mason Jars have been a popular trend over the past couple of years for fun gifts and home decor.  Now, with the introduction of the Jars of Love in the 2016/17 Stampin’ Up! Annual Catalogue, the trend is continued to paper crafting. I have no idea why it has taken me this long to purchase the Jar of Love stamp set and coordinating framelits.  And, the best part is that, if you purchase the stamp set and framelits together, you receive a 10% discount for bundling the two products. Mason Jars Handmade Greeting Cards

Recipe

Stamps: Jar of Love. Ink/Markers: Island Indigo, Pool Party, Sahara Sand. Paper: Sahara Sand, Island Indigo, Whisper White, Blooms and Bliss DSP. Accessories: Big Shot, Layering Squares Framelits, Everyday Jars Framelits, Island Indigo Cotton Ribbon. I used the blues and greens paper from the Blooms and Bliss designer series paper.  I have tended to go towards the pinks and plums paper, however, these colours are just as pretty and soft. This a very easy card to recreate and yes, there is a framelit for the handle, bonus!  Create the water using Pool Party ink and stamp off once. Because the stamps are made from photopolymer, it is very easy to do 2-step stamping.  Just line up the water stamp with the bottom and sides of the jar.  With the many sentiments or greetings in this set, a variety of cards can be created easily. To purchase any of the supplies to create this card, click on the images below or visit my ONLINE STORE. Look for more card samples using this set, I know that you will have to have it to create you own mason jars handmade greeting card.  

Product List

Jar Of Love Photopolymer Bundle
[142342]
Sahara Sand Classic Stampin' Pad
Sahara Sand Classic Stampin’ Pad
[126976]
Pool Party Classic Stampin' Pad
Pool Party Classic Stampin’ Pad
[126982]
Island Indigo Classic Stampin' Pad
Island Indigo Classic Stampin’ Pad
[126986]
Sahara Sand 8-1/2" X 11" Card Stock
Sahara Sand 8-1/2″ X 11″ Card Stock
[121043]
Island Indigo 8-1/2" X 11" Card Stock
Island Indigo 8-1/2″ X 11″ Card Stock
[122923]
Whisper White 8-1/2" X 11" Card Stock
Whisper White 8-1/2″ X 11″ Card Stock
[100730]
Blooms & Bliss Designer Series Paper
[141654]
Layering Squares Framelits Dies
[141708]
Did you like this post? Say thanks by sharing it
Pin It
Posted in Cards, Occasions | Tagged 2-Step Stamping, Big Shot, Framelits, Stampin Up, stampingup, su | Leave a Reply

Canadian Demonstrator Benefits with Stampin Up – Join My Team

Posted on November 1, 2016 by Karen GilbertNovember 1, 2016  

Canadian Demonstrator Benefits

When I blog about Canadian Demonstrator benefits, it usually consists of the business end of becoming a demonstrator.  However, today, I am going to let you in on one of the fun benefits. You know the saying,“all work and no play, makes Jack a dull boy”. Canadian Demonstrator Benefits Well, this weekend I am off to Vancouver to attend Stampin’ Up! On Stage Event.

What is the On Stage Event and how can this be a benefit?

Stampin’ Up hosts the On Stage Event and all demonstrators can join in this event.  Because Stampin’ Up!  is now a global company, it is important that the home office touch base with their demonstrators no matter where they live.  At one time Stampin’ Up! hosts a large event in various countries.  In the past I attended the convention in Salt Lake City Utah.  It was at that convention where new catalogues and new products were revealed to the attendees.  Now, all countries are on the same time frame for new catalogues and products, so Stampin’ Up! wanted to release them to as many demonstrators at the same time. This year, the On Stage event is held in Queensland Australia.  However that is a bit far and costly for some of  the demonstrators.  So, I am attending the On Stage Local event in Vancouver. There a many On Stage Local events held throughout Stampin’ Up! world and you can opt in attend the one closest to you. These local events consist of stamping, prize patrol, swapping, etc just like the main event.  It’s a time when like minded people come together to celebrate their love of stamping. Of course it’s not all fun.  There are talks related to running the business and how you can grow your business. Here is a link to a post that I did in September that outlines ways to make money as a Stampin’ Up! demonstrator. To read what Stampin’ Up! says about becoming a Canadian Demonstrator click HERE Are you interested learning more about Canadian Demonstrator Benefits?  Contact me EMAIL
Did you like this post? Say thanks by sharing it
Pin It
Posted in Business Opportunity, Stampin Up | Tagged business, Stampin Up, stampingup, su | Leave a Reply

Christmas Elf Handmade Card – Make One For The Young At Heart

Posted on October 27, 2016 by Karen GilbertOctober 27, 2016  

Christmas Elf

A Christmas Elf handmade card will delight the young ones and the young at heart.  Sometimes it is fun to create a whimsical card.  After all elves are popular at Christmas, for instance, the Elf on the Shelf. Christmas Elf

Recipe

Stamps: Jolly Friends, Holly Jolly Greetings. Ink: Black StazOn, Garden Green, Real Red, Blossom Blush Marker, Chocolate Chip Marker. Paper: Whisper White, Garden Green, Real Red, Blush Blossom, Gold Glimmer, Dazzling Diamonds Glimmer, This Christmas Specialty DSP. Accessories: Big Shot, Cable Knit Dynamic Textured Impressions Embossing Folder, Layering Ovals Framelits, Christmas Greetings Framelits, Jolly Hat Builder Punch, Word Window Punch, Modern Label Punch.

Tips to Create This Card

Emboss the Real Red card stock with the Cable Knit Dynamic Textured Impressions Embossing Folder.  This is a new type of embossing folder which will give you a deeper impression on the card stock.  However, to get a real deep impressions, you need to break down fibers in the card stock.  You can do that by spraying your card stock with water, however, spraying with Rubbing Alcohol (97%) will also break down the fibers, but your card stock will dry faster than if you use water. Stamp the elf’s head on Blush Blossom cardstock (retired) and colour his cheeks using the Blush Blossom Marker (retired), and his hair with the Chocolate Chip Marker.  If you are so lucky as to have these two products, great, if not, stamp the elf head on Watercolor card stock and colour the face using  Blushing Bride, Peekaboo Peach, and blend with the Blender Pen.  It is important to blend well.  Don’t put too much colour on the face to start, you can also go darker. Stamp the head and the scarf on Whisper White and when you have completed coloring his head, fussy cut and place on the Whisper White head and pop up with dimensionals. Now, the Word Window and the Modern Label punches are also discontinued.  But, you can use the Tags and Labels Framelits to achieve the same effect. There is a coordinating punch for the Jolly Friends stamp set.  BONUS!.  See THIS POST for the benefits of a coordinating punch. Now that I have given you a few alternatives to the products that I used on this card, you can create you own Christmas Elf handmade card.

Product List

Jolly Friends Photopolymer Bundle
[143511]
Holly Jolly Greetings Clear-Mount Stamp Set
[139882]
Jet Black Stazon Ink Pad
[101406]
Garden Green Classic Stampin' Pad
Garden Green Classic Stampin’ Pad
[126973]
Real Red Classic Stampin' Pad
Real Red Classic Stampin’ Pad
[126949]
Whisper White 8-1/2" X 11" Card Stock
Whisper White 8-1/2″ X 11″ Card Stock
[100730]
Garden Green 8-1/2" X 11" Card Stock
Garden Green 8-1/2″ X 11″ Card Stock
[102584]
Real Red 8-1/2" X 11" Card Stock
Real Red 8-1/2″ X 11″ Card Stock
[102482]
Gold Glimmer Paper
Gold Glimmer Paper
[133719]
Dazzling Diamonds Glimmer Paper
[135315]
This Christmas Designer Series Specialty Paper
[141628]
Cable Knit Dynamic Textured Impressions Embossing Folder
[143537]
Layering Ovals Framelits Dies
[141706]
Christmas Greetings Thinlits Dies
[139659]
Jolly Hat Builder Punch
[141847]
Alternative Product List
Tags & Labels Framelits Dies
[138282]
2016-2018 In Color Stampin' Write Markers
2016-2018 In Color Stampin’ Write Markers
[141393]
Blender Pens
Blender Pens
[102845]
Watercolor Paper
Watercolor Paper
[122959]
Did you like this post? Say thanks by sharing it
Pin It
Posted in Cards, Christmas, Holiday | Tagged Big Shot, Christmas, Embossing, Framelits, occasions, stampinup, Watercolor | Leave a Reply

Paper Crafting Trends and How To Keep Up – Sign Up Today

Posted on October 25, 2016 by Karen GilbertOctober 25, 2016  

Paper Crafting Trends

Did you know that there is a thing called paper crafting trends?  Yes, just like trends in fashion, decor, vehicles, mobile devices, etc., there are paper crafting trends. Paper Crafting Trends Remember the eyelets attached with a tool to the front of cards as an embellishment. Then, the vintage look for cards with torn edges, wrinkled ribbon, lace, and stamps that depicted antique phones, apothecary jars, and ornate sofas. The geometric look with triangles, squares, quatrefoil and other motifs were around for a couple of years. Yes, trends come and go in the crafting world.  So, how do you stay up to date with the latest trends? There is a simple answer to that question.  You sign up for the Simply Said With Karen email list.

How to Sign Up

There are benefits to joining the list. Just for signing up you will receive a free gift.  You will receive the gift immediately in an email..  A video will lead you through the steps to create a luminary. Great way to start the holiday season.. You may have noticed a pop-up box if this is the first time you have visited the Simply Said with Karen Blog.  Just fill in your name and email address.  Of if you are looking around the blog and missed the pop-up box, look over to your right and at the top of the column, there is a sign up box.

Benefits

THere are benefits to adding your name to the Simply Said with Karen Email List.  Currently the 12 Weeks of Christmas campaign is running.  Each week, for 12 weeks you receive an email with an exclusive Christmas or Holiday project.  The projects consist of beautiful Christmas cards, gifts for giving, and of course, the tags, bag and wrap for the gifts under the tree. A list of benefits is also available.  CLICK HERE. So, go sign up now to you receive the latest paper crafting trends.      
Did you like this post? Say thanks by sharing it
Pin It
Posted in Newsletter | Tagged business, newsletter, paper crafitng, Stampin Up, su, trends | Leave a Reply

Make Crafting Easy with Stamps and Matching Punches

Posted on October 23, 2016 by Karen GilbertOctober 23, 2016  

Make Crafting Easy with Stamps and Matching Punches

Do you look for ways to make crafting easy?  We look for ways to make a pretty card or a scrapbook page with not a lot of time.  Life is busy and yet many of us still find time to craft. This Christmas Card absolutely fits the “make crafting easy” criteria. Make crafting easy

Recipe

Stamps: Holly Berry Happiness. Ink: Tuxedo Black Memento, Emerald Envy. Paper: Whisper White, Emerald Envy, Real Red, Mint Macaron, Red Glimmer, This Christmas Specialty DSP. Accessories: Big Shot, Lots of Labels, Pretty Pines Thinlits Dies, Holly Embossing Folder, Holly Berry Builder Punch, Candy Cane Lane Baker’s Twine, Rhinestone Jewels, Wink of Stella Brush – clear. As a part of a fundraiser, this card was 1 of 9 cards that the participant would create.  For the participants it was a time to get together with like minded crafters and meet new people, chat and get a head start on their Christmas card. The Holly Berry Happiness stamp set and coordinating Holly Berry Builder Punch fit the bill.  And, what is even better is that if you purchase this stamp set and coordinating punch as a bundle, you can save 10% on the purchase price. WOW! Check out my ONLINE STORE. if you are really short on time, eliminate the pine boughs and the cording behind the sentiment. The card will look just as beautiful without them. Here’s a tip.  To add dimension to your bow, punch one bow, stamp and punch another bow and layer on the top of the previous bow with dimensions.  The punch will punch the bow, single larger and small holly leaves and single berries or a group of three berries. What are you waiting for?  There a many coordinating products in the Holiday catalogue that will make crafting easy.

Product List

Holly Berry Happiness Photopolymer Bundle
[143505]
Tuxedo Black Memento Ink Pad
[132708]
Emerald Envy Classic Stampin' Pad
Emerald Envy Classic Stampin’ Pad
[141396]
Whisper White 8-1/2" X 11" Card Stock
Whisper White 8-1/2″ X 11″ Card Stock
[100730]
Emerald Envy 8-1/2" X 11" Cardstock
Emerald Envy 8-1/2″ X 11″ Cardstock
[141415]
Real Red 8-1/2" X 11" Card Stock
Real Red 8-1/2″ X 11″ Card Stock
[102482]
Red Glimmer Paper
Red Glimmer Paper
[121790]
This Christmas Designer Series Specialty Paper
[141628]
Holly Textured Impressions Embossing Folder
[141634]
Lots Of Labels Framelits Dies
[138281]
Pretty Pines Thinlits Dies
[141851]
Candy Cane Lane Baker's Twine
Candy Cane Lane Baker’s Twine
[141983]
Rhinestone Basic Jewels Embellishments
[119246]
Clear Wink Of Stella Glitter Brush
[141897]
     
Did you like this post? Say thanks by sharing it
Pin It
Posted in Cards, Christmas, Holiday Catalogue | Tagged bundles, Christmas, occasions, Stampin Up, stampingup, su, tips | Leave a Reply

Fall Birthday Card with Unique Ribbon Treatment to Make at Home

Posted on October 16, 2016 by Karen GilbertOctober 16, 2016  

Fall Birthday Card With Unique Ribbon Treatment

Use Fall images and colours to make a fall birthday card.  Most birthday cards that you find to purchase do not use of Fall icons.  Let’s look at two possible reasons. First, while fall colours can be beautiful and rich for some people, the card of choice for a female is a pretty card with flowers. Of course, the colours would be vibrant or soft.  What colours and images are you attracted to when creating a birthday card for a  female. Number 2 is that fall birthday cards tend to be more masculine than feminine.  Fall colours do lend themselves to masculine cards.  Some people do not give handmade cards to males because they see or feel that the cards are not appreciated and valued.  Ever read the book “Men are from Mars and Women are From Venus” by John Gray?  The emotional makeup of men and women are quite different.  Actually, this book is very interesting and gives insight into the differences between men and women. Fall Birthday Card

Recipe

Stamps: Basket of Wishes, Vintage Leaves. Ink: Tip Top Taupe, Black StazOn, Crushed Curry, Versa Mark, Markers: Crushed Curry, Pumpkin Pie, Old Olive, Basic Gray, Tangerine Tango. Paper: Tip Top Taupe, Very Vanilla, Old Olive, Crushed Curry. Accessories: Big Shot, Woodgrain Emboss Folder, Tags and Labels Framelits, Leaflets Framelits, Copper Embossing Powder, 5/8” Burlap Ribbon, Sponge Daubers. A few details on this card:
  • Emboss the Tip Top Taupe layer with the Woodgrain Embossing Folder and sponge with Tip Top Taupe ink to bring out the grain.
  • Stamp the basket and the gourds on Very Vanilla using StazOn ink. Allow to dry before colouring will Stampin Write Markers.
  • Measure out enough ribbon to make the diagonal ribbon banner. Stamp circles on the 5/8″ Burlap ribbon with Sponge Dauber and Crushed Curry.
  • Heat Emboss one of the leaves with Copper Embossing Powder and die cut with matching Leaflet Framelits. Tie the stem with a strand from the Burlap Ribbon.
  • Attach the ribbon to the Tip Top Taupe woodgrain layer in a zig-zag pattern.
  • Lastly, attach the art piece of the Old Olive layer and layer on the ribbon.
  Your Fall Birthday card is completed.  Require products to complete this card? Click on any of a the images below and you will be taken to my ONLINE STORE  

Product List

Basket Of Wishes Photopolymer Stamp Set
[142200]
Tip Top Taupe 8-1/2" X 11" Cardstock
Tip Top Taupe 8-1/2″ X 11″ Cardstock
[138336]
Old Olive 8-1/2" X 11" Card Stock
Old Olive 8-1/2″ X 11″ Card Stock
[100702]
Crushed Curry 8-1/2" X 11" Card Stock
Crushed Curry 8-1/2″ X 11″ Card Stock
[131199]
Very Vanilla 8-1/2" X 11" Card Stock
Very Vanilla 8-1/2″ X 11″ Card Stock
[101650]
Tip Top Taupe Classic Stampin' Pad
Tip Top Taupe Classic Stampin’ Pad
[138325]
Crushed Curry Classic Stampin' Pad
Crushed Curry Classic Stampin’ Pad
[131173]
Versamark Pad
Versamark Pad
[102283]
Regals Stampin' Write Markers
Regals Stampin’ Write Markers
[131262]
Brights Stampin' Write Markers
Brights Stampin’ Write Markers
[131259]
Neutrals Stampin' Write Markers
Neutrals Stampin’ Write Markers
[131261]
Woodgrain Textured Impressions Embossing Folder
[127821]
Tags & Labels Framelits Dies
[138282]
Copper Stampin' Emboss Powder
Copper Stampin’ Emboss Powder
[141636]
5/8" (1.6 Cm) Burlap Ribbon
5/8″ (1.6 Cm) Burlap Ribbon
[141487]
Did you like this post? Say thanks by sharing it
Pin It
Posted in Cards, Occasion Cards, Techniques | Tagged Big Shot, Birthday, Embossing, Framelits, Stampin Up, Techniques | Leave a Reply

Three Stamping Mistakes I Will Never Make Again

Posted on October 12, 2016 by Karen GilbertOctober 12, 2016  

Three Stamping Mistakes I’ll Never Make Again

Today, I am writing about three stamping mistakes that I have made and why I will never make them again. Have you made stamping mistakes?  I will take you from this Three Stamping Mistakes to this. Three Stamping Mistakes When I began to rubber stamp, there were lots of mistakes.  However, I am a firm believer that you turn mistakes into opportunities to learn.  So therefore, mistakes happen, fix them, and move on.

Here are the three stamping mistakes that I have made.

  • In the beginning, often my stamped images would not be clear, or they would be blotchy.   This problem can happen when you stamp with solid stamps. That is, stamps that have no design etchings.  To correct this issue, use a white eraser to rough up the stamp a bit.  Often stamps have a finish on them that prevents the ink from fully adhering to the stamp surface.  Be sure to clean your stamp to get rid of the eraser residue.

Example of Solid Stamp

 
Celebrate Today Photopolymer Stamp Set
[137138]
 
  • Purchasing too many stamps and never having the right one is another common problem for beginner stampers. When starting out on a new hobby, it is tempting to purchase stamps for every occasion, with or without the sentiments.  Many stamps can suit various occasions, and it is the sentiments stamps that often throw us off.  It is best to purchase stamps with images that can be used for many occasions.  These could be flowers, butterflies, balloons, etc.  Now purchase you sentiment stamps separately.  Usually sentiment stamps will have sentiments for various occasions. And, yes, you may have to “think outside the box“.

Example of Sentiment Stamp Sets

 
Happy Happenings Clear-Mount Stamp Set
[139381]
  • Lastly, we run out of ideas.  In this situation, we really need to stretch ourselves and try something new. There are many different mediums that you can use for stamping. Did you know that you can use your stamps on fabric, or polymer, or wood.  You may have to change the type of ink you use, for example using a permanent ink such as StaZon instead of water based ink.
Click Here for More Information on Stamping on a Different Medium Finally, when you make any of these three stamping mistakes, try one or two of the options above.  
Did you like this post? Say thanks by sharing it
Pin It
Posted in Occasions, Stampin Up, Techniques | Tagged Beginner Stampers, occasions, stamping mistakes, Techniques | Leave a Reply

Cookie Cutter Santa Card Ready For Christmas Eve – Are You?

Posted on October 8, 2016 by Karen GilbertOctober 7, 2016  

Cookie Cutter Santa Card

Do you know someone that would be delighted with this cute Cookie Cutter Santa card?  I can think of a few people, such as children, grandchildren, and yes, some adults would love this card. Santa is ready for Christmas Eve.  He has a lot of work to do before Christmas Eve to keep the little ones happy.  You could use this card as a cute tag for a Santa parcel. Cookie Cutter Santa Card

Recipe

Stamps: Cookie Cutter Christmas, Peaceful Pines. Ink: StazOn Black, Cherry Cobbler, Crumb Cake, Garden Green, Markers: Basic Black, Cherry Cobbler Paper: Very Vanilla, Cherry Cobbler, Garden Green, This Christmas Specialty DSP, Gold Foil. Accessories: Big Shot, Brick Wall Embossing Folder, Perfect Pines Framelits, Lots of Labels Framelits, Cookie Cutter Builder Punch, Baker’s Twine Trio Pack (Red). This card is easy to create and you could make multiples in no time. Santa is stamped with Black StazOn ink.  This ink is a must if you plan to colour your  stamped image with water based ink.  In this case, Santa is coloured using Basic Black and Cherry Cobbler markers.  Santa is punched with the Cookie Cutter Builder Punch.  Create the tree using Garden Green and Cherry Cobbler cardstock and the Perfect Pines Framelits.  I choose to use the framelit that has tiny holes looping down the tree.  To give the illusion of tree lights, the underlay is cut using Cherry Cobbler cardstock. Of course, the tree needs to be decorated with Christmas ball and no tree is completed without presents under it. Finally, the Very Vanilla is cut with the Lots of Labels framelits, textured with the Brick Wall embossing folder and sponged with Crumb Cake ink.  Kind of looks like the chimney Santa would use on Christmas Eve. Now it’s your turn to create your own Cookie Cutter Santa card.  Need supplies to create the card?  You can purchase the items by clicking on the link which will take you straight to my ONLINE STORE 

Product List

Cookie Cutter Christmas Photopolymer Stamp Set
[142043]
$26.00
Peaceful Pines Photopolymer Stamp Set
[139728]
$32.00
Cherry Cobbler 8-1/2" X 11" Card Stock
Cherry Cobbler 8-1/2″ X 11″ Card Stock
[119685]
$10.00
Crumb Cake Classic Stampin' Pad
Crumb Cake Classic Stampin’ Pad
[126975]
$8.50
Very Vanilla 8-1/2" X 11" Card Stock
Very Vanilla 8-1/2″ X 11″ Card Stock
[101650]
$11.25
Whisper White 8-1/2" X 11" Card Stock
Whisper White 8-1/2″ X 11″ Card Stock
[100730]
$11.25
Garden Green 8-1/2" X 11" Card Stock
Garden Green 8-1/2″ X 11″ Card Stock
[102584]
$10.00
This Christmas Designer Series Specialty Paper
[141628]
$17.00
Gold Foil Sheets
Gold Foil Sheets
[132622]
$5.25
Cherry Cobbler Classic Stampin' Pad
Cherry Cobbler Classic Stampin’ Pad
[126966]
$8.50
Garden Green Classic Stampin' Pad
Garden Green Classic Stampin’ Pad
[126973]
$8.50
Basic Black Stampin' Write Marker
Basic Black Stampin’ Write Marker
[100082]
$4.75
Cherry Cobbler & Garden Green Stampin' Write Markers
Cherry Cobbler & Garden Green Stampin’ Write Markers
[141972]
$9.25
Perfect Pines Framelits Dies
[139665]
$35.00
Brick Wall Textured Impressions Embossing Folder
[138288]
$11.25
Baker's Twine Trio Pack
Baker’s Twine Trio Pack
[141999]
$12.00
Did you like this post? Say thanks by sharing it
Pin It
Posted in Cards, Christmas | Tagged Big Shot, Christmas, Coloring | Leave a Reply

Post navigation

← Older posts
Newer posts →

Become A Simply Said With Karen Facebook Fan!

Follow Simply Said With Karen On Twitter!

View Our Videos on the Simply Said With Karen YouTube Channel!

Follow Me on Pinterest
Shop on line 24/7
Email me

Simply Said with Karen Online Classes

Simply Said with Karen Online Classes

Classes Just For You

Events Calendar

Click on the Calendar for a list of my Events

Search

Categories

Paper Pumpkin

Paper Pumpkin

30 minutes of exciting creativity with Paper Pumpkin
Join Now
Click On Image to start your monthly subscription

As Featured On EzineArticles

DISCLAIMER

Disclaimer Text and pictures © Karen Gilbert unless otherwise noted; all rights reserved. You may use cards, scrapbook pages, and other project designs shown here are for personal inspiration. Please do not copy my designs for submission to contests, magazines, etc. Thank you for respecting these limitations. This is a personal blog and is not endorsed by any Company or Organization. All stamped images © 1990-2016 Stampin' Up! unless otherwise noted.

Privacy Policy

Privacy Policy
©2017 - - Weaver Xtreme Theme
↑