fbpx ↓
 

Simply Said With Karen

Paper Crafting For All

  • Home
  • Blog
  • Stampin’ Up! Online Store
  • On Line Classes
  • View Our Catalogues
  • Event Calendar
  • Cool Tool Tip Videos
  • Questions and Answers
  • Simply With Heart – Etsy Store
  • Gift Certificates
  • Privacy Policy
  • Contact Me
Home » Blog << 1 2 3 4 … 75 76 >>

Post navigation

← Older posts
Newer posts →

Frog and Turtle Wedding Card

Simply Said With Karen Posted on September 14, 2023 by Karen GilbertSeptember 14, 2023

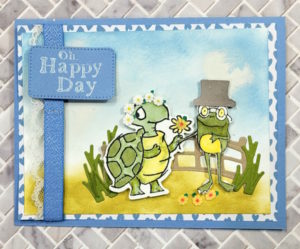
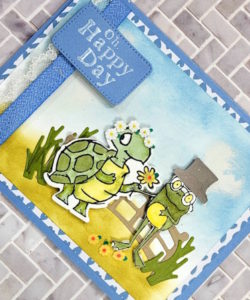
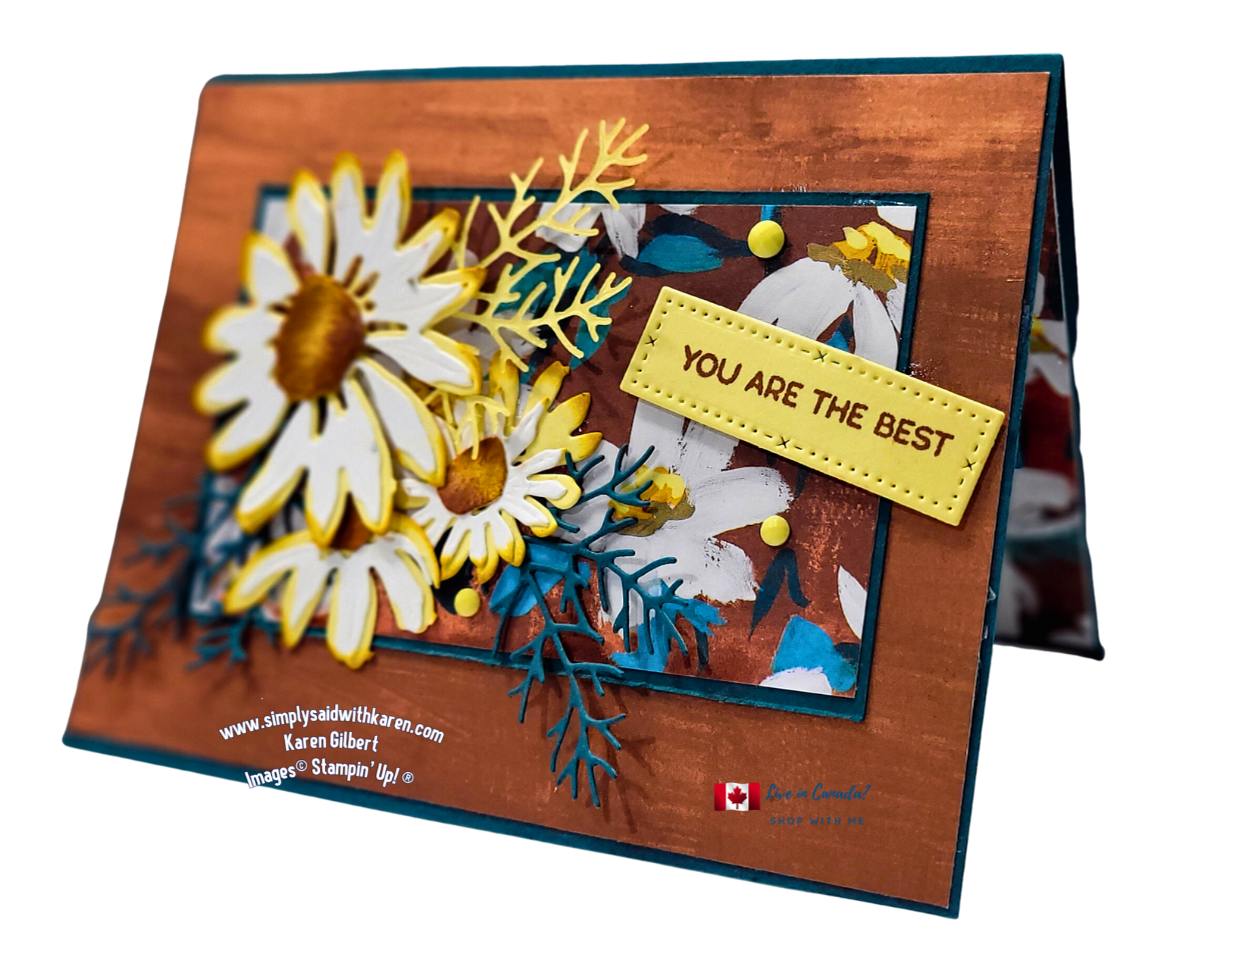
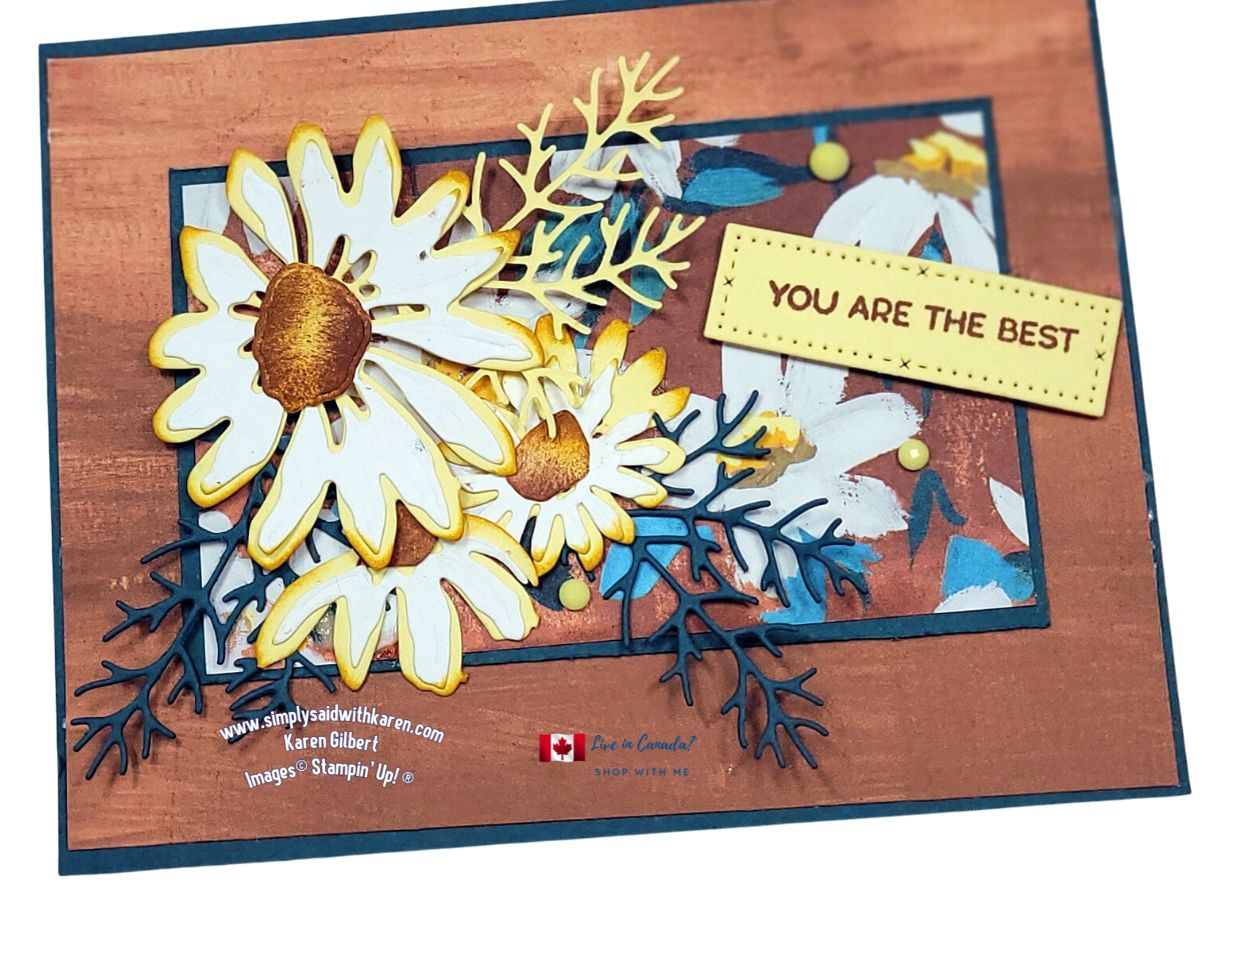
The Frog and Turtle Wedding Card was so fun to create.  I was commissioned to create this card as the theme would be frogs and turtle.

Frog and Turtle Wedding card

Wedding Card Recipe:

SUPPLIES

Stamps: Playing in the Rain, So Hoppy Together,

Ink:Boho Blue, Wild Wheat, Memento Tuxedo Black, Basic Gray, Stampin’ Blends: Old Olive Duo, Lemon Lolly Duo, Daffodil Delight, Color Lifter.

Paper (with measurements):
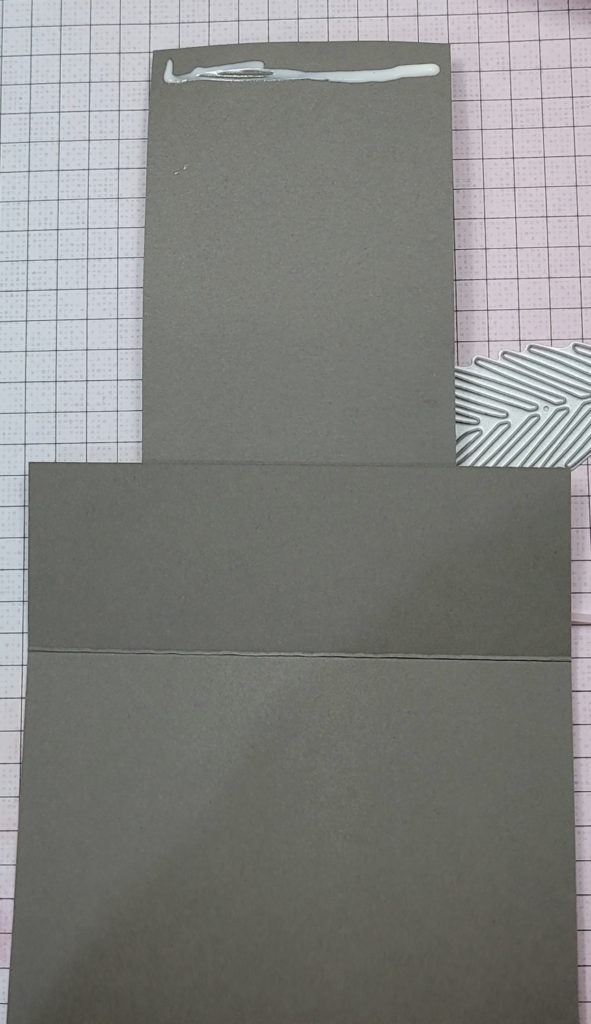
Boho Blue 8-1/2″ x 5: Score at 4-1/4″ and burnish with Bone Folder, scraps for sentiment,
Basic White 2   pieces at 3 x 3/4″5″
Crumb Cake: scraps for Bridge,
Mossy Meadow: Scraps for foliage
Gray Granite: Scraps for Top Hat,
In Color 6″x 6″Designer Series Paper – 5-1/4″ x 4″ and scrap for envelope.

Accessories: Loose Daisy Embellishments, Basic Stampin’ Emboss Powders (White), Boho Blue 3/8″ Textured Ribbon, Lace Trim.

Tools: Blending Brushes, Stampin:Cut & Emboss, Playing in the Rain Dies, Nested Essential Dies, Heat Gun, Snowman Punch , Embossing Essentials.

Basic Supplies: Paper Trimmer,Bone folder, Paper Snips, Take Your Tool Pick, Stampin’ SEAL+, Multipurpose Liquid Glue, Stampin’ Dimensionals, Mini Glue Dots.

Instructions:
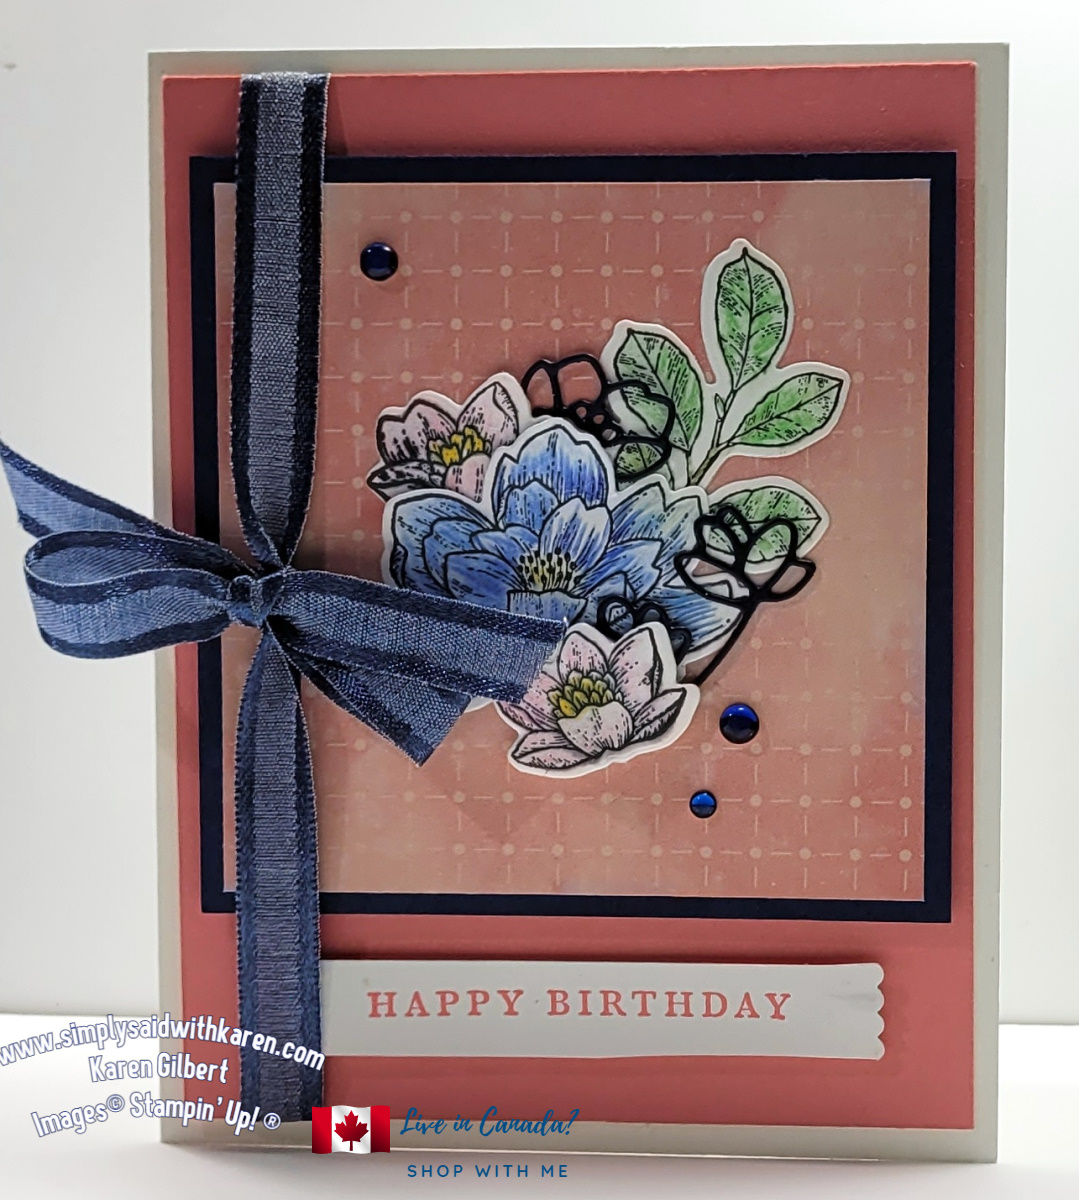
  1. Fold the Boho Blue cs at4 -1/4″ score line.  This is your card base.
  2. On the Basic White panel, using your Blending Brush or Dauber to add Boho Blue ink on the top half.  Leave portions with no ink to form clouds.
  3. On the bottom half of this panel, add Wild Wheat ink with Blending Brush to make the ground.
  4. Stamp the turtle and frog on the Basic White scraps with Memento Tuxedo Black ink.
  5. Use the Stampin’ Blends to colour the turtle and the frog.. Fussy cut the frog with your Paper Snips and the turtle with the coordinating dies.
  6. Die cut the fence from Crumb Cake cs and adhere to the panel.
  7. The greenery is cut from Mossy Meadow cs scraps. Edge the greenery with Mossy Meadow ink. Attach to ends of the fence./
  8. Punch the frog’s top hat from Gray Granite cs, use a dauber to texturize with Basic Gray ink.  Attach to the frog’s head.
  9. Attach the the frog and turtle to the front of the bridge with Stampin’ Dimensionals.
  10. Adhere the Loose Daisy Embellishments to the top of the turtle’s head. Add some to the ground below the frog’s feet.
  11. Attach the image panel to the DSP and adhere the DSP to the card base.
  12. Adhere each end of Lace ribbon to underside of DSP.  Lap the Boho ribbon over the lace trim and attach to the back.  With Multipurpose Liquid Glue, attach the panel to the card base.
  13. Use the Embossing Buddy and rub across the Boho Blue cs scrap. Stamp the sentiment with VersaMark Ink, and heat with Heat Tool.  Cool the embossed panel before die cutting with the smallest die from the Nested Essential Dies
  14. Adhere sentiment to the ribbon with Stampin’ Dimensional.
  15. Attach a piece of the DSP to the envelope flap and trim with Paper Snips.frog and turtle wedding cardImportant Information
  16. The So Hoppy Along is not currently available.  However if you save your stamps, it was a Sale-a-Bration item and is found in the January 2019 SAB Brochure.

If you wish to recreate this card, please shop my ONLINE STORE.  Any questions? I will answer them. karen@simplysaidwithkaren.com

Posted in Annual Catalogue, Cards, Occasions, Wedding | Tagged dies, Embossing, occasions, Stampin Blends, Stampin Up, stamping up, stampinup, su, Techniques

Split Front Fancy Fold For the Inspirations in Ink Blog Hop

Simply Said With Karen Posted on August 29, 2023 by Karen GilbertAugust 29, 2023

For you today, I created a split front card fancy fold for you.  This card is also for the monthly Inspirations in Ink Blog Hop.

The Inspirations in Ink Blog Hop is a group of global demonstrators, who like to share with others.  First, thank you for stopping by to see what I created.  You can hop to other blogs if you scroll below and click on the link under my name.  Please also leave some love.

Split Front Card Fancy Fold

For you today, I created a split front card fancy fold for you.  This card is also for the monthly Inspirations in Ink Blog Hop.

The Inspirations in Ink Blog Hop is a group of global demonstrators, who like to share with others.  First, thank you for stopping by to see what I created.  You can hop to other blogs if you scroll below and click on the link under my name.  Please also leave some love.  Split Card Fun Fold

Recipe for a Split Fold Card

Stamp set: Earthen Textures, Inked & Tiled.

Inks:  Gray Granite, Moody Mauve.

Papers: Pebbled Path, (11 ” x 4-1/4/28cm x 14.0cm), Basic White (4” x 5-1/4”/1 x 10cm” x 13.5 cm), Gray Granite (scrap For Vase), Earthen Textures Designer Series Paper. (2 @ 1-1/4” x 4”, 1 @ 2-1/4” x 4”, 2 @ 3.5cm x 10cm,1 @ 5.5cm x 10cm).

Accessories: Adhesive Backed Sequins Trio, 3/8 Sheer Ribbon Pack (Bubble Bath 7” 18cm.

Tools: Earthen Textures Dies, Stampin’ Cut & Emboss Machine, Small Blending Brush

Basic Tools: Paper Trimmer,Bone folder, Paper Snips, Take Your Tool Pick, Stampin’ SEAL+, Multipurpose Liquid Glue, Stampin’ Dimensionals, Mini Glue Dots.


INSTRUCTIONS

  1. Use your Paper Trimmer and cut off 1-1/2” (3.8cm) from the end of Card Base, move the paper over to the 2-1/2” (6.4cm) mark and cut off (becomes center panel). Now move the paper over to the 1-1/2” (3.8cm) mark and score.  This becomes the top flap.
  2. Adhere 1-1/4”(5.7cm) DSP to the flap, the 1-1/4” (5.7cm) DSP to the 1-1/2” (6.4cm) strip and the 2-1/4” (5.7cm) DSP to the 2-1/2(6.4cm) Strip. with Multipurpose Liquid Glue.
  3. Attach the center panel by laying a line of glue across the top of the panel. *see photo. Align the single strip to the bottom of the card, hold and lay a strip of glue to the bottom of the center panel and attach to the strip. *see photo. Split Front Fun Fold Split Front Fun Fold
  4. Stamp the left hand side of the Basic White panel with the grassy looking stamp. Stamp with Granite Gray ink (stamp off once before stamping on cs.  Choose a sentiment that will fit behind the center panel and not be seen.  Stamp with Moody Mauve ink.Split Front Fun Fold
  5. Die cut the fan foliage in Moody Mauve cs. Sponge Moody Mauve ink on the tips of the fan. Trim off a bit of the stem and attach it to center panel with Stampin’ Dimensionals.
  6. Stamp the scrap of Granite Grey cs with the smaller vase loaded with Pebbled Path ink. Fussy cut with Paper Snips and attach to the center panel with Stampin’ Dimensionals.
  7. Make a Bow with the Bubble Bath ribbon 7” (18cm) and attach with Glue dots below the fan leaf.
  8. Add the white Adhesive Backed Sequins to the card front.
  9. If you wish, decorate the envelope with DSP and/or a stamped image.

Visit the other Inspirations in Ink Blogs. 

You are at Karen Gilbert’ Blog. Thanks for Hopping with us.

Theresa McEntee – USA

Robbie Rubala – USA 

Christy Gridley – USA  

Deirdre Croal – USA

Karen Beck – Canada


PRODUCT LIST
Earthen Textures Bundle (English)
[161514]
Inked & Tiled Cling Stamp Set (English)
[161158]
Gray Granite Classic Stampin' Pad
Gray Granite Classic Stampin’ Pad
[147118]
Moody Mauve Classic Stampin' Pad
Moody Mauve Classic Stampin’ Pad
[161649]
Pebbled Path 8 1/2" X 11" Cardstock
Pebbled Path 8 1/2″ X 11″ Cardstock
[161722]
Basic White 8 1/2" X 11" Cardstock
Basic White 8 1/2″ X 11″ Cardstock
[159276]
Gray Granite 8-1/2" X 11" Cardstock
Gray Granite 8-1/2″ X 11″ Cardstock
[146983]
Earthen Elegance 12" X 12" (30.5 X 30.5 Cm) Designer Series Paper
Earthen Elegance 12″ X 12″ (30.5 X 30.5 Cm) Designer Series Paper
[161503]
Adhesive Backed Sequins Trio
[161206]
3/8" (1 Cm) Sheer Ribbon Combo Pack
3/8″ (1 Cm) Sheer Ribbon Combo Pack
[161635]
Add All to Cart
Posted in Annual Catalogue, Blog Hops, Cards, Fancy Folds, Feminine, Occasion Cards, Stampin Up, Stampin' Emboss and Die Cut Machine | Tagged Birthday, bundles, occasions, Stampin Up, stamping up, stampingup, su, Techniques

Trucking Along Through the Mountains

Simply Said With Karen Posted on August 20, 2023 by Karen GilbertAugust 19, 2023

Combine the stamp, Trucking Along and the Masterfully Made Designer Series Paper to create a fun card.  When I create, my thought process is: how can I turn this into a story.  Well, I did just that with the DSP and the stamp.  This set is so cute, however there are many possibilities with the various stamps to create a lovely card.

Trucking Along
Trucking Along Card Recipe

Supplies

Stamp Set:Trucking Along, Timeless Arrangements

Ink: Wild Wheat, Lemon Lolly, Copper Clay,  VersaMark.

Paper (including cutting Measurements): Night of Navy – 4-1/4″ x 11″, scraps, Basic White 4″ x 5-1/4″, Scraps, Wild Wheat, 4-3/8″ x 4- 3/8″, Fresh as a Daisy Designer Series Paper (Panel with Daisies and Blue Sky), Masterfully Made Designer Series Sheet Paper with the Mountains (Night of Navy , Pretty Peacock.)

Accessories: Silver Threaded Twine, Brights Stampin’ Write Markers: Daffodil Delight, Old Olive, Basic Stampin’ Emboss Powder (white), .

Supplies;
Tools: Stampin’ Cut & Emboss Machine, Trucking Along Builder Punch, Basic Borders dies.

Basic Supplies
Paper Trimmer
Bone folder
Paper Snips
Take Your Tool Pick
Shammy
Sponge Daubers
Stampin’ Seal+
Stampin’ Dimensionals
Clear Blocks

Instructions

  1. Score the card base at 5-1/2″. Burnish with Bone Folder to make a crisp fold.
  2. Attach the panel from the Fresh as a Daisy DSP to the Winter Wheat.
  3. Cut the Masterfully Made DSP to include the a variety of mountains.  Cut along the tops of the mountain. **You may have to cut a single mountain to cover all the DSP.*** Adhere to Wild Wheat cs with Seal+.
  4. Cut a strip of DSP 4-3/8″ x 3/4″.  Ensure the strip has shades of Wild Wheat (Moody Mauve on the  back side. Attach to bottom of DSP with Seal+.
  5. Stamp the truck outline with Wild Wheat ink.  Ink the fill stamp with Lemon Lolly ink.  Stamp the tires with Tuxedo Black Memento ink. Stamp a sentiment on the truck door with   Copper Clay ink.  Punch using the Trucking Along Builder Punch. Use the flowers stamp with Stampin’ Write Markers (Daffodil Delight & Old Olive). Stamp on a scrap basic white card stock and fussy cut with Paper Snips.
  6. Create 2 Trees.  Ink the tree outline stamp with Mossy Meadow Stampin’ Write Marker and the detailed stamp with Old Olive Marker.  Sorry, you will have to fussy cut the trees.  Place the trees one behind the other.  Attach the back tree with Stampin’ Seal+ and the the front tree with Mini Stampin’ Dimensionals .
  7. Place the truck on the “road” and attach with Dimensionals.  Adhere the flowers with Glue Dots.
  8.  Snip a length of Silver Threaded Twine, separate the fibers and use 3 or 5 strands and tie a bow. Use Glue Dots to adhere below the truck.
Finish Off the Card
  1. Attach the Basic White card panel to the inside of the card.
  2. Use the die with the jagged edge from the Basic Borders die set and trim the bottom of the Night of Navy card base. Get the die centered with equal distance between the sides of the cardbase.
  3. Stamp a sentiment on Night of Navy cardstock with VersaMark.  Sprinkle with White emboss powder and heat with HEAT TOOL.  Trim, so that there is only a narrow border.  Cut between some of the words. Attach to the Basic White panel.
Download and print the tutorial

Please Note: The Trucking Along builder Punch is due to be in the Warehouse around October 12th.  Currently, the stamp is unavailable.  I wouldn’t take a chance waiting so you can purchase the bundle.  Get the stamp and you won’t be  sorry.

I hope that you have enjoyed the tutorial.  You can find all the supplies at my ONLINE STORE

You can also, click on the images below to see the products that I used

If you have any questions, please contact me at karen@simplysaidwithkaren.com

Product List

Trucking Along Photopolymer Stamp Set (English)

Trucking Along Photopolymer Stamp Set (English)
[162299]

Timeless Arrangements Photopolymer Stamp Set (English)

Timeless Arrangements Photopolymer Stamp Set (English)
[161521]

Wild Wheat Classic Stampin' Pad

Wild Wheat Classic Stampin’ Pad
[161651]

Lemon Lolly Classic Stampin' Pad

Lemon Lolly Classic Stampin’ Pad
[161666]

Copper Clay Classic Stampin' Pad

Copper Clay Classic Stampin’ Pad
[161647]

Versamark Pad

Versamark Pad
[102283]

Night Of Navy 8-1/2" X 11" Cardstock

Night Of Navy 8-1/2″ X 11″ Cardstock
[100867]

Basic White 12 X12 (30.5 X 30.5 Cm) Cardstock

Basic White 12 X12 (30.5 X 30.5 Cm) Cardstock
[159231]

Wild Wheat 8 1/2" X 11" Cardstock

Wild Wheat 8 1/2″ X 11″ Cardstock
[161725]

Fresh As A Daisy 12" X 12" (30.5 X 30.5 Cm) Designer Series Paper

Fresh As A Daisy 12″ X 12″ (30.5 X 30.5 Cm) Designer Series Paper
[161289]

Masterfully Made 12" X 12" (30.5 X 30.5 Cm) Designer Series Paper

Masterfully Made 12″ X 12″ (30.5 X 30.5 Cm) Designer Series Paper
[161192]

Silver Threaded Twine

Silver Threaded Twine
[159662]

Brights Stampin' Write Markers

Brights Stampin’ Write Markers
[147157]

Basics Embossing Powders

Basics Embossing Powders
[155554]

Stampin' Cut & Emboss Machine

Stampin’ Cut & Emboss Machine
[149653]

Basic Borders Dies

Basic Borders Dies
[155558]

Trucking Along Builder Punch

Trucking Along Builder Punch
[162305]
Add All to Cart

Posted in Cards, Children, Embossing, Feminine, July - Dec Mini Catalogue, Masculine, Occasion Cards, Occasions, Techniques, Thank You | Tagged 2-Step Stamping, bundles, dies, Embossing, occasions, Stampin Up, stamping up, stampingup, stampinup, su, Thank You

Sitting on the Porch in the Summer time

Simply Said With Karen Posted on August 9, 2023 by Karen GilbertAugust 7, 2023

Sitting on the porch in the summer time is a  great time of year.  School is finished, people are planning vacations, there are backyard barbeques and the sounds of kid playing outside. I know that not everyone is celebrating summer.  You have to be living in the northern hemisphere.  But right now, we are experiencing the hottest weather ever.  There are forest fires, and drought seems to be closing in. There are many  people around the Kamloops region who have been evacuated and I am sure there will be more.  I think about them and wish the families, their pets and livestock well.  But if you do get to experience the art of sitting on the porch and day dreaming away the day, then you are in a good place.

Lazy Hazy Days There are 10 cute sentiments with this stamp set and I am sure that you will find one which is suitable.  You can also combine the various sentiments to make many more

Sitting on the Porch Card Recipe

SUPPLIES

Stamps:   Lazy Days.

Ink: Boho Blue, Balmy Blue, Smokey Slate,  Misty Moonlight, Stampin’ Blends: Balmy Blue, Stampin’ Write Markers: Pecan Pie, Granny Apple Green,

Paper: ‘(with ,measurements Basic White:-8-1/2″ x 5-1/4″ scored at 4-1/4″, burnish with Bone Folder, 5″ x 2″, 4-1/4″X 4-1/4″, and 2-1/2″ x 4-1/4″ Misty Moonlight – 4″ x 5-1/4″ Boho Blue – 2-1/2″ x 4-1/4″ Garden Green: Scraps Countryside Inn Designer Series Paper  2-1/4″ x 5″

Accessories: 2023-2025 Jute Twine cut a piece – 20 “, Lazy Days Dies, Tools: Stampin’ Cut & Emboss Machine Exposed Brick 3 D Emboss Folder Mini  Blending Brushes Basic Supplies Paper Trimmer Bone folder Paper Snips Take Your Tool Pick Shammy Clear Blocks: A, B, C, J, H Stampin’ Seal/Seal+ Multipurpose Liquid Glue Stampin’ Dimensionals Mini Glue Dots

INSTRUCTIONS

  • With the Basic White panel (cut with the corner dies), use the Mini Blending brush and the Balmy Blue ink to do a color wash. Stamp the rug with the Balmy Blue ink.
  • Stamp the sentiment on Basic White cs with Misty Moonlight ink and die cut with the label die.
  • Assemble card
    1. Before attaching the frame, attach the clouds, bird, fence and leaves to the image panel.
    2. Tie a length of Boho Blue Jute Twine around the card front, and tie a blow off to the side.
    3. Attach the Boho Blue frame to the card front with Stampin’ Dimensionals.
    4. Die cut the towel from DSP and attach to the rocking chair arm.
    5. Attach the Rocking Chair to the frame in the bottom right hand corner, and attach the basket to the left bottom hand side.
    6. Attach the sentiment to the bottom right of card.
    7. Stamp an additional sentiment on the inside Basic White panel and layer a 1/2″ strip of DSP to the bottom.
    8. Decorate your envelope if you wish.

    Sitting on the porch

     If you have any questions, please reach out to me at karen@simplysaidwithkaren.com If you need supplies to create this card, SHOP with ME

    I hope you enjoyed this sitting on the porch card and will make one for yourself an or for someone else.


    Product List

    Lazy Days Bundle
    Lazy Days Bundle
    [161343]
    Boho Blue Classic Stampin' Pad
    Boho Blue Classic Stampin’ Pad
    [161650]
    Balmy Blue Classic Stampin' Pad
    Balmy Blue Classic Stampin’ Pad
    [147105]
    Smoky Slate Classic Stampin' Pad
    Smoky Slate Classic Stampin’ Pad
    [147113]
    Misty Moonlight Classic Stampin' Pad
    Misty Moonlight Classic Stampin’ Pad
    [153118]
    Balmy Blue Stampin' Blends Combo Pack
    Balmy Blue Stampin’ Blends Combo Pack
    [154830]
    Neutrals Stampin' Write Markers
    Neutrals Stampin’ Write Markers
    [147158]
    Brights Stampin' Write Markers
    Brights Stampin’ Write Markers
    [147157]
    Basic White 8 1/2" X 11" Cardstock
    Basic White 8 1/2″ X 11″ Cardstock
    [159276]
    Misty Moonlight 8-1/2" X 11" Cardstock
    Misty Moonlight 8-1/2″ X 11″ Cardstock
    [153081]
    Boho Blue 8 1/2" X 11" Cardstock
    Boho Blue 8 1/2″ X 11″ Cardstock
    [161724]
    Garden Green 8-1/2" X 11" Cardstock
    Garden Green 8-1/2″ X 11″ Cardstock
    [102584]
    Countryside Inn 12" X 12" (30.5 X 30.5 Cm) Designer Series Paper
    Countryside Inn 12″ X 12″ (30.5 X 30.5 Cm) Designer Series Paper
    [161467]
    2023–2025 In Color Jute Trim
    2023–2025 In Color Jute Trim
    [161637]
    Lazy Days Dies
    Lazy Days Dies
    [161342]
    Exposed Brick 3 D Embossing Folder
    Exposed Brick 3 D Embossing Folder
    [161600]
    Mini Glue Dots
    Mini Glue Dots
    [103683]
    Add All to Cart
    1. Cut Basic White card base and burnish the 4-1/4″ fold with Bone folder.
    2. Emboss the basic white panel with the Exposed Brick 3 D Emboss Folder Attach on the right hand side to the Misty Moonlight
    3. Attach the DSP to the left side of the Misty Moonlight panel
    4. Use the 4-1/2″ x 4-1/2″ Basic White cs and stamp:
      • Stamp bird & clouds with Smokey Slate ink. Color bird with Balmy Blue Stampin’ Blend
      • Use Pecan Pie ink to ink the  rocker stamp.
      • Stamp the rug with Balmy Blue Ink.
      • Stamp the basket & leaves with the Black Memento ink and colour with Pecan Pie and Granny Apple Green Stampin’ Blends.
      • Die cut the various elements with the matching Lazy Day Dies. Die cut the fence from Whisper White and the foliage from the Garden Green cs.
      • Die cut the fence from Basic White cs.  Cut one end off so that fits the white background panel.
    5. Die cut the Boho Blue cs with the 2nd and 3rd largest dies. Nest the smaller die inside the larger die. This becomes the frame.
    6. With the Basic White panel (cut with the corner dies), use the Mini Blending brush and the Balmy Blue ink to do a color wash. Stamp the rug with the Balmy Blue ink.
    7. Stamp the sentiment on Basic White cs with Misty Moonlight ink and die cut with the label die.
    Assemble card
    1. Before attaching the frame, attach the clouds, bird, fence and leaves to the image panel.
    2. Tie a length of Boho Blue Jute Twine around the card front, and tie a blow off to the side.
    3. Attach the Boho Blue frame to the card front with Stampin’ Dimensionals.
    4. Die cut the towel from DSP and attach to the rocking chair arm.
    5. Attach the Rocking Chair to the frame in the bottom right hand corner, and attach the basket to the left bottom hand side.
    6. Attach the sentiment to the bottom right of card.
    7. Stamp an additional sentiment on the inside Basic White panel and layer a 1/2″ strip of DSP to the bottom.
    8. Decorate your envelope if you wish.

    Sitting on the porch

     If you have any questions, please reach out to me at karen@simplysaidwithkaren.com If you need supplies to create this card, SHOP with ME

    I hope you enjoyed this sitting on the porch card and will make one for yourself an or for someone else.


    Product List

    Lazy Days Bundle
    Lazy Days Bundle
    [161343]
    Boho Blue Classic Stampin' Pad
    Boho Blue Classic Stampin’ Pad
    [161650]
    Balmy Blue Classic Stampin' Pad
    Balmy Blue Classic Stampin’ Pad
    [147105]
    Smoky Slate Classic Stampin' Pad
    Smoky Slate Classic Stampin’ Pad
    [147113]
    Misty Moonlight Classic Stampin' Pad
    Misty Moonlight Classic Stampin’ Pad
    [153118]
    Balmy Blue Stampin' Blends Combo Pack
    Balmy Blue Stampin’ Blends Combo Pack
    [154830]
    Neutrals Stampin' Write Markers
    Neutrals Stampin’ Write Markers
    [147158]
    Brights Stampin' Write Markers
    Brights Stampin’ Write Markers
    [147157]
    Basic White 8 1/2" X 11" Cardstock
    Basic White 8 1/2″ X 11″ Cardstock
    [159276]
    Misty Moonlight 8-1/2" X 11" Cardstock
    Misty Moonlight 8-1/2″ X 11″ Cardstock
    [153081]
    Boho Blue 8 1/2" X 11" Cardstock
    Boho Blue 8 1/2″ X 11″ Cardstock
    [161724]
    Garden Green 8-1/2" X 11" Cardstock
    Garden Green 8-1/2″ X 11″ Cardstock
    [102584]
    Countryside Inn 12" X 12" (30.5 X 30.5 Cm) Designer Series Paper
    Countryside Inn 12″ X 12″ (30.5 X 30.5 Cm) Designer Series Paper
    [161467]
    2023–2025 In Color Jute Trim
    2023–2025 In Color Jute Trim
    [161637]
    Lazy Days Dies
    Lazy Days Dies
    [161342]
    Exposed Brick 3 D Embossing Folder
    Exposed Brick 3 D Embossing Folder
    [161600]
    Mini Glue Dots
    Mini Glue Dots
    [103683]
    Add All to Cart
    Posted in Birthday, Cards, Feminine, General, Masculine, Tips and Techniques | Tagged Birthday, bundles, dies, Embossing, occasions, Stampin Blends, Stampin Up, stamping up, stampingup, stampinup, su

    Inked and Tiled Bundle for the Inspiration in Ink July Blog Hop

    Simply Said With Karen Posted on July 25, 2023 by Karen GilbertJuly 26, 2023

    The Inked and Tiled bundle comes with the stamp set and 2 punches.  In addition to the bundle, you can  purchase the Lost Lagoon Ribbon and  Designer Series Paper.  You can use one item code (161207) to order the entire suite.

    Once again, it’s the monthly Blog Hop with the Inspirations in Ink bloggers.  This is a group of Stampin’ Up! demonstrators around the globe who love to create, give you tips and demonstrate techniques.  So join us by clicking on the links at the end of this post and see what everyone is up to.

    Inked and Tiled Bundle

    Inked and Tiled Bundle“Just a Note” Card Recipe

    SUPPLIES

    Stamps: Inked & Tiled.

    Ink: Lost Lagoon. Stampin’ Write Markers: Petal Pink, Lost Lagoon.

    Paper: Petal Pink (card base) 8-1/2″ x 5-1/2″ score at 4-1/4″ burnish with Bone Folder, Lost Lagoon 4″ x 5-1/4″, Basic White: 2-1/2″ x 2-1/2″, 4″ X 5-1/4″ {Inside Panel), 4-3/4″ x 5″
    Inked Botanical 6″ x 6″ Designer Series Paper, 3″ X 3″. 1/2 x 4″

    Accessories: Lost Lagoon Ribbon – 7″ and 4″, Tinsel Gems Three Pack, Stylish Shapes Dies

    Tools: Stampin’ Cut & Emboss Machine

    Basic Supplies
    Paper Trimmer
    Bone folder
    Paper Snips
    Take Your Tool Pick
    Shammy

    Stampin’ Seal/Seal+
    Multipurpose Liquid Glue
    Stampin’ Dimensionals
    Mini Glue Dots

    Inked and Tiled Bundle

    INSTRUCTIONS
    1. Fold Base Card in half along score line and burnish with Bone Folder.
    2. Adhere DSP to Lost Lagoon Cardstock with Multipurpose Liquid Glue.
    3. Attach each end of 7” (18cm) ribbon to the back of the Lost Lagoon Cardstock with Seal+.
    4. Cut 4” (10cm) of ribbon. Tie a faux bow around the length of ribbon below where the circles will be placed. Trim ribbon ends.
    5. Die cut DSP with Largest circle from the Stylish Shapes Dies.
    6. Die cut Basic White cardstock with the 3rd largest circle from the Essential Shapes Dies
    7. Colour the flower with the Petal Pink Stampin’ Write Marker. Colour the leaves with the Lost Lagoon Stampin’ Write Marker. Huff on the stamp to moisten the ink and stamp on the Basic White circle.
    8. Stamp the tiny flowers in Petal Pink ink in various places on the Basic White circle.
    9. Attach the Basic White circle to the DSP circle with Seal+. Attach to card front with Dimensionals.
    10. Stamp the sentiment on the scrap of Basic White with Lost Lagoon ink. Die cut with the small flag die. Attach to the card front just over the circle.
    11. Attach the strip of DSP to the bottom of the inside panel and stamp the small flower in Lost Lagoon ink. Stamp an additional sentiment if you wish.
    12. If you wish, decorate the envelope with DSP and/or a stamped image.

    Please join us in the Blog Hop to see the amazing creations from other demonstrators. The Inked and Tiled Bundle coordinates with many other products in the catalogue and online,

    Click on the links below to visit the other blogs in the hop. I hope that you  have enjoyed the blog hopw

    If you  have any questions, please contact me at karen@simplysaidwithkaren.com.

    Blog Hop Links 

    Karen Beck – Canada
    Theresa McEntee – USA
    Rebecca Nutley – Australia
    Robbie Rubala – USA
    Vicky Wright – Australia
    Christy Gridley – USA
    Deirdre Croal – USA

    Thanks for hopping along with us. Please leave some love for all of us.


    Click any of the images and you will be taken to my ONLINE STORE for supplies used in this card.

    Product List

    Inked & Tiled Bundle (English)

    Inked & Tiled Bundle (English)
    [161168]

    Lost Lagoon Classic Stampin' Pad

    Lost Lagoon Classic Stampin’ Pad
    [161678]

    Subtles Stampin' Write Markers

    Subtles Stampin’ Write Markers
    [161698]

    Petal Pink 8-1/2" X 11" Cardstock

    Petal Pink 8-1/2″ X 11″ Cardstock
    [146985]

    Lost Lagoon 8-1/2" X 11" Cardstock

    Lost Lagoon 8-1/2″ X 11″ Cardstock
    [133679]

    Basic White 8 1/2" X 11" Cardstock

    Basic White 8 1/2″ X 11″ Cardstock
    [159276]

    Inked Botanicals 6" X 6" (15.2 X 15.2 Cm) Designer Series Paper

    Inked Botanicals 6″ X 6″ (15.2 X 15.2 Cm) Designer Series Paper
    [161157]

    Lost Lagoon ¼" (6.4 Mm) Bordered Ribbon

    Lost Lagoon ¼” (6.4 Mm) Bordered Ribbon
    [161171]

    Tinsel Gems Three Pack

    Tinsel Gems Three Pack
    [161624]

    Stylish Shapes Dies

    Stylish Shapes Dies
    [159183]

    Stampin' Cut & Emboss Machine

    Stampin’ Cut & Emboss Machine
    [149653]
    Add All to Cart
    Posted in Annual Catalogue, Blog Hops, Cards, Encouragement, General, Occasion Cards, Occasions, SU Only Products | Tagged bundles, demonstrator, dies, Framelits, occasions

    Zesty Birthday Card with Buckle Closure

    Simply Said With Karen Posted on July 11, 2023 by Karen GilbertJuly 13, 2023

     .Create a zesty Birthday Card and add a Buckle Closure—Looks harder than it is.

    Zesty Birthday card

    Zesty Card Recipe

    Stamps Set: Sweet Citrus

    Ink: Lemon Lime Twist, Lemon Lolly, Daffodil Delight, Flirty Flamingo, VersaMark.

    Paper: Basic White – 8-1/2″ x 5-1/2″ score at 2-1/8″ and   6-1/2″ and burnish with Bone Folder, 5-1/2″ x 4-1/4″, Lemon Lime Twist – Cut 2 @ 2″ x 5-1/4″  scraps for flowers and sentiment, Bright & Beautiful 6″ x 6″ Designer Series Paper –  -Cut 2@ 1-7/8″ x 6-1/8″, for inside panel cut 1 Lemon Lime Twist DSP  @4″ x 5-1/4″

    Accessories: Opaque Ovals, Basic Stampin’ Emboss Powder (White).

    Tools: Stampin’ Cut & Emboss Machine, Sweet Citrus Hybrid  Dies and Embossing Folder.

    Basic Supplies
    Paper Trimmer
    Bone folder
    Paper Snips
    Take Your Tool Pick
    Shammy

    Stampin’ Seal/Seal+
    Multipurpose Liquid Glue
    Stampin’ Dimensionals
    Mini Glue Dots

    Instructions

    1. On a piece of Basic White cs, stamp the fruit with Lemon Lolly ink, stamp a second set of fruit with Lemon Lime Twist. Use Filtry Flamingo &  Lemon Lolly inks and stamp flowers on Basic White scraps, Stamp the centers of flowers with Daffodil Delight ink. Use the Lemon Lime Twist ink and stamp 3 sets of leaves
    2. Die cut both sets of fruit with the Sweetest Dies.
    3. Lay the fruit pieces in the Embossing Fold and run through Stampin’ Cut & Emboss Machine.
    4. Arrange the Lemon Lime Twist fruit,  the Lemon Lolly fruit, flowers and leaves on the Lemon Lime Twist panel.  Attach the pieces with a combination of Multipurpose Glue, Glue Dots, and Dimensionals.

    Zesty Birthday card

    5. Attach the 2 pieces of Lemon Lime Twist to the front panels and the dsp panels to the Lemon Lime Twist cs. 

    6.Before attaching the closure flaps, emboss them with the Sweet Citrus Embossing Folder. Click this LINK. for the video explaining how to create this Buckle Closure.

    7.Stamp a sentiment on the scrap of Lemon Lime Twist with VersaMark ink.  Sprinkle with White Embossing Powder and use the Heat Tool.  Cut the sentiment in half and attach to front of card.

    Decorate the Buckle Tabs with the left over fruit that you stamped, die cut and embossed.

    Do you know someone that would enjoy a zesty Birthday Card? 

    See the product list below, click on any of the images and you will be taken to my ONLINE STORE


    Zesty Birthday Card

    How to create the Buckle Closure

    ***Note*** The cutting measurement for triming the buckles are incorrect in the video.   Cut the large one at 3″ and the smaller one at 3-1/2″

    Click this LINK. for the video explaining how to create this Buckle Fold.

    Product Supplies

    Product List
    Sweet Citrus Photopolymer Stamp Set (English)
    Sweet Citrus Photopolymer Stamp Set (English)
    [160641]
    Lemon Lime Twist Classic Stampin' Pad
    Lemon Lime Twist Classic Stampin' Pad
    [147145]
    Lemon Lolly Classic Stampin' Pad
    Lemon Lolly Classic Stampin' Pad
    [161666]
    Daffodil Delight Classic Stampin' Pad
    Daffodil Delight Classic Stampin' Pad
    [147094]
    Flirty Flamingo Classic Stampin' Pad
    Flirty Flamingo Classic Stampin' Pad
    [147052]
    Basic White 8 1/2" X 11" Cardstock
    Basic White 8 1/2" X 11" Cardstock
    [159276]
    Lemon Lime Twist 8-1/2" X 11" Cardstock
    Lemon Lime Twist 8-1/2" X 11" Cardstock
    [144245]
    Bright & Beautiful 6" X 6" (15.2 X 15.2 Cm) Designer Series Paper
    Bright & Beautiful 6" X 6" (15.2 X 15.2 Cm) Designer Series Paper
    [161449]
    Opaque Ovals
    Opaque Ovals
    [161622]
    Stampin' Cut & Emboss Machine
    Stampin' Cut & Emboss Machine
    [149653]
    Sweet Citrus Hybrid Embossing Folder
    Sweet Citrus Hybrid Embossing Folder
    [160644]
    Basics Embossing Powders
    Basics Embossing Powders
    [155554]
    Add All to Cart
    Posted in Birthday, Cards, Catalogues, Feminine | Tagged occasions, Stampin Up, stampingup, su

    Focus on the Cheerful Daisies Bundle and the Coordinating DSP

    Simply Said With Karen Posted on June 27, 2023 by Karen GilbertJune 27, 2023

    Cheerful Daisies

    Focus on the Cheerful Daisies bundle is the theme this month.  And with that focus comes the Inspirations in Ink Blog Hop.

    We would really appreciate it if you were to hop along with us.

    This stamp & die set when used together or separately has so many possibilities.  I cannot seem to use it  enough.

    Focus on the Cheerful Daisies Bundle

    Encouragement Card Recipe

    Stamp sets:
    Cheerful Daisies.
    Timeless Arrangements.

    Inks:
    Copper Clay
    Crushed Curry

    Paper with measurements:
    Basic White
    4” x 5-1/4”
    Pretty Peacock
    8 ½” x 5 ½”, scored @ 4 ¼”
    4-1/4” x 2-5/8”
    Scraps for twigs.
    Lemon Lolly
    4-1/4” x 3-1/2”
    Scraps for twigs and sentiment
    Fresh as a Daisy Designer Series Paper
    4-1/8” x 5-3/8”
    4-1/8” x 2-1/2”
    Accessories
    Adhesive Backed Solid Gems

    Tools
    Sponge Daubers
    Stampin’ Cut & Emboss Machine
    Cheerful Daisies Dies
    Basic Supplies
    Paper Trimmer
    Bone folder
    Paper Snips
    Take Your Tool Pick
    Shammy

    Stampin’ Seal/Seal+
    Multipurpose Liquid Glue
    Stampin’ Dimensionals
    Mini Glue Dots

    Instructions

    1. Fold Base Card in half along score line prior to burnishing with Bone Folder.
    2. Use a piece of the plain Copper Clay DSP and attach to Card Base.
    3. Cut a piece of the flowered DSP and attach it to the smaller Pretty Peacock panel. Attach this panel to the the DSP.
    4. Die cut the joined daisy from Lemon Lolly cs. Cut the leaves off and save for another project, separate the remaining daisies. Cut 1 twig from Lemon Lolly.
    5. Use Crushed Curry ink and Sponge Dauber to apply ink to the daisy petals.
    6. Die cut the daisy inserts from Basic White cs. Attach to the Lemon Lolly daisies.
    7. Die cut 2 small daisy centers and large one from Basic White. Use Sponge Dauber and Copper Clay ink to apply to centers. Leave some white space and fill that with Crushed Curry ink. Adhere to the white dailies with Glue Dots.
    8. Arrange and attach the 2 smaller daisies and twigs with Seal, Seal + or Multipurpose Liquid Blue as per the photo below. Attach the large daisy with Dimensionals.
    9. Stamp a sentiment from the Timeless Arrange stamp set on Lemon Lolly. Die cut with the appropriately sized label die.  Attach to card front and attach 3 Adhesive Backed Solid Gems.
    10. On the Basic White panel for the inside, place a DSP strip to the righthand side.
    11. Stamp a sentiment on the inside of the card panel.

     Cheerful Daisies Bundle

    I hope you have enjoyed this focus on the Cheerful Daisies Bundle.  If you have any questions, please contact me at karen@simplysaidwithkaren.com  and I will get back to you with an answer. Below is list of demonstrators who are taking part in this blog hop.  Please hop along with us to see the various card designs.

    Just click on the hyperlinks below and you will be taken to the other blogs.

    Thank you for taking part in our Blog Hop.

    Blog Roll

    Deirdre Croal – USA


    Julie Golding-Page – Canada


    Karen Beck – Canada


    Theresa McEntee – USA


    Rebecca Nutley – Australia


    Robbie Rubala – USA


    Christy Gridley – USA

    Product List

    Cheerful Daisies Photopolymer Stamp Set (English)

    Cheerful Daisies Photopolymer Stamp Set (English)
    [161290]

    Timeless Arrangements Photopolymer Stamp Set (English)

    Timeless Arrangements Photopolymer Stamp Set (English)
    [161521]

    Copper Clay Classic Stampin' Pad

    Copper Clay Classic Stampin’ Pad
    [161647]

    Crushed Curry Classic Stampin' Pad

    Crushed Curry Classic Stampin’ Pad
    [147087]

    Basic White 8 1/2" X 11" Cardstock

    Basic White 8 1/2″ X 11″ Cardstock
    [159276]

    Pretty Peacock 8-1/2" X 11" Cardstock

    Pretty Peacock 8-1/2″ X 11″ Cardstock
    [150880]

    Lemon Lolly 8 1/2" X 11" Cardstock

    Lemon Lolly 8 1/2″ X 11″ Cardstock
    [161720]

    Fresh As A Daisy 12" X 12" (30.5 X 30.5 Cm) Designer Series Paper

    Fresh As A Daisy 12″ X 12″ (30.5 X 30.5 Cm) Designer Series Paper
    [161289]

    Adhesive Backed Solid Gems

    Adhesive Backed Solid Gems
    [161300]

    Stampin' Cut & Emboss Machine

    Stampin’ Cut & Emboss Machine
    [149653]

    Cheerful Daisies Dies

    Cheerful Daisies Dies
    [161296]

    Sponge Daubers

    Sponge Daubers
    [133773]
    Add All to Cart


    Checkout more inspiration

    Daisy Delight

    Daisy Lane

    Posted in Annual Catalogue, Blog Hops, Cards, General, Occasion Cards, Sponging | Tagged bundles, dies, occasions, Stampin Up, stamping up, stampinup, su

    Masterfully Made Suite- Demonstrator Training Blog Hop June 2023

    Simply Said With Karen Posted on June 12, 2023 by Karen GilbertJune 12, 2023

    Demonstrator Training Blog Hop


    Gorgeously Made Suite

    The Demonstrator Training Blog Hop, is a monthly event, where many International Stampin’ Up! Demonstrators submit their blogs so that others can see what it is we do, love & share

    The theme for the Blog Hop is “Thank You”.  Sometimes we don’t say thank you enough, so this is a good way to get the words out.

    I invite you to hop along with the rest of us.  You will find the list of blog hop participants at the end of this post.  When you hop, please leave them a comment to inspire them.

    Thank You Card Recipe

    Stamps: Gorgeously Made

    Ink:VersaMark, Pretty Peacock.

    Paper (including measurements):
    Pretty Peacock – 4-1/4″ x 11″ Score at 5-1/2″ burnish fold with Bone Folder,  4″ x 3-1/4″ ( for greenery) scrap for sentiment.
    Lost Lagoon – 4″ x 5-1/4″
    Crushed Curry – 4″ x 3″
    Basic White: 4″ x 5-1/4″
    Masterfully Made DSP: 3-1/2″ x 3-1/4″

    Accessories:
    Gorgeously Made Dies, Linen Thread, Adhesive Backed Sequins, Basics Emboss Powder (White), Basics Emboss Folders.

    Tools: Stampin’ Cut & Emboss Machine, Heat Tool, Embossing Additions Tool Kit.

    Basic Supplies:
    Bone Folder
    Stampin’ Seal+
    Tear & Tape Adhesive
    Stampin’ Dimensionals
    Mini Glue Dots
    Clear Blocks  -C, E, G.
    Simply Shammy or Stampin’ Scrub
    Stampin’ Mist Stamp Cleaner
    Grid Paper or Small Grid Paper
    Paper Snips
    Paper Trimmer

    Masterfully Made Suite

    Instructions

    1. Cut card base, score at 5-1/2″ and burnish with Bone Folder
    2. Use the Hashtag Emboss Folder and Stampin’ Cut & Emboss to  emboss the Lost Lagoon CS panel.
    3. Attach to card base with adhesive of your choice.
    4. Use the notched die to die cut on the ends of the designer series pape and the other end with the die that appears to tear the paper.
    5. Attach to the embossed Lost Lagoon panel on the diagonal.
    6. Die cut the open leaf with Stampin’ Cut & Emboss Machine on Crushed Curry cs.
    7. Die cut the closed leaves with Stampin’ Cut & Emboss Machine on Pretty Peacock cs.
    8. Attach the Pretty Peacock leaves to DSP and ahe Crushed Curry open leaves over the Pretty Peacock leaves.
    9. Die cut the Pretty Peacock scrap with the sentiment die. Swipe the embossing buddy across the cs and stamp the sentiment with Versamark.  Sprinkle White Emboss Powder over sentiment and hold with Tweezers and heat with Heat Tool.
    10. Attach over the bottom stems with Dimensionals.   Tie a bow with the Linen Thread and attach with Mini Glue Dots below the sentiment.

    Inside Card Panel

    1.  Decorate the Basic White panel with a strip of DSP down the right hand side.
    2. Stamp the closed leaves on the left hand side with Pretty Peacock ink.
    3. Stamp a sentiment if you wish.


    Masterfully Made Suite

    Again, thank you for visiting my Blog and now it’s time to to hop other Demonstrators from around the world.


    Click on the Comment Bubble above to go straight to the comments section.


    Require any supplies to create this card, then SHOP WITH ME.  If you have questions, please contact me at karen@simplysaidwithkaren.com

    Product List

    Gorgeously Made Bundle (English)

    Gorgeously Made Bundle (English)
    [161203]

    Gorgeously Made Cling Stamp Set (English)

    Gorgeously Made Cling Stamp Set (English)
    [161193]

    Versamark Pad

    Versamark Pad
    [102283]

    Pretty Peacock Classic Stampin’ Pad

    Pretty Peacock Classic Stampin’ Pad
    [150083]

    Pretty Peacock 8-1/2" X 11" Cardstock

    Pretty Peacock 8-1/2″ X 11″ Cardstock
    [150880]

    Lost Lagoon 8-1/2" X 11" Cardstock

    Lost Lagoon 8-1/2″ X 11″ Cardstock
    [133679]

    Crushed Curry 8-1/2" X 11" Cardstock

    Crushed Curry 8-1/2″ X 11″ Cardstock
    [131199]

    Basic White 12 X12 (30.5 X 30.5 Cm) Cardstock

    Basic White 12 X12 (30.5 X 30.5 Cm) Cardstock
    [159231]

    Masterfully Made 12" X 12" (30.5 X 30.5 Cm) Designer Series Paper

    Masterfully Made 12″ X 12″ (30.5 X 30.5 Cm) Designer Series Paper
    [161192]

    Gorgeously Made Dies

    Gorgeously Made Dies
    [161202]

    Linen Thread

    Linen Thread
    [104199]

    Adhesive Backed Sequins Trio

    Adhesive Backed Sequins Trio
    [161206]

    Basics Embossing Powders

    Basics Embossing Powders
    [155554]

    Basics 3 D Embossing Folders

    Basics 3 D Embossing Folders
    [161598]

    Stampin' Cut & Emboss Machine

    Stampin’ Cut & Emboss Machine
    [149653]

    Heat Tool (Us And Canada)

    Heat Tool (Us And Canada)
    [129053]

    Embossing Additions Tool Kit

    Embossing Additions Tool Kit
    [159971]
    Add All to Cart
    Posted in Annual Catalogue, Cards, General, Occasion Cards, OnLine Products Only, Thank You | Tagged bundles, dies, Embossing, occasions, Stampin Up, stamping up, stampingup, stampinup, su, Thank You

    Timeless Arrangements Bundle – Inspirations in Ink Blog Hop

    Simply Said With Karen Posted on May 30, 2023 by Karen GilbertJune 1, 2023

    The Timeless Arrangements Bundle is the featured bundle for this month Inspirations in Ink Blog Hop,  We are a group of International Stampin’ Up! demonstrators that like to share what we create to give others ideas.

    Please hop with us to see what others are creating.

    Timeless Arrangements Bundle


    Timeless Arrangements Bundle

    Not only is the stamp set the focus of this card, it also uses one of the 2023-2025 In Colours – Moody Mauve.  The one thing I really like about Stamin’ Up! is the coordination of its products, like cardstock, inks, embellishments and designer series paper.

    Timeless Arrangements Recipe

    Stamps: Timeless Arrangements

    Inks: Moody Mauve. Moody Mauve Blends

    Paper:
    Basic White: 5-1/2″ x 8-1/2″ score at 4-1/4″ and burnish with Bone Folder, 2@ 4″ x 5-1/4″ , Scraps for leaves and sentiment.
    Vellum: scraps.
    Embellishments: Moody Mauve 3/8″ Woven Ribbon – 8″

    Tools:
    Stampin’ Cut & Emboss Machine, Timeless Arrangements Dies, Blending Brushes. Blender  Pen.

    Basic Supplies:
    Bone Folder
    Stampin’ Seal+
    Tear & Tape Adhesive
    Stampin’ Dimensionals
    Mini Glue Dots
    Clear Blocks  -A B, C, G.
    Simply Shammy or Stampin’ Scrub
    Stampin’ Mist Stamp Cleaner (153648)
    Grid Paper or Small Grid Paper
    Paper Snips
    Paper Trimmer

    Instructions:

    1. Use the dies to cut the leaves with the bases attached – 2 from Basic White scraps, 1 from Vellum.
    2. Stamp 2 single leaves from scraps of Basic White. Die cut with matching dies.  Colour the leaves with Moody Mauve ink and a Blender Pen.
    3. Color the leaves/flowers cut from the Vellum with a Moody Mauve Blends.
    4. Cut a frame for the sentiment.  Use the largest one.  Stamp a sentiment on the frame with Moody Mauve ink.
    5. Attach the leaves to the frame on an angle. See image below.
    6. Use a Blending Brush & Moody Mauve ink and swirl the color in the center of the Basic White panel.  TIP: Remember to swirl the brush on the piece of scrap paper to get rid of some ink.  You can always go back and add more ink, but you can’t take the ink away.
    7. Fold the ribbon in half and attach the two halves together with Seal+ Adhesive.  Attach over the ink on the Basic White  panel with Seal+, trim the ribbon ends.
    8. Arrange the leaves and flowers on a diagonal behind the sentiment panel. Attach over the ribbon with Seal+.
      Timeless Arrangements Bundle
    9. On the second Basic White panel, stamp another sentiment in Moody Mauve ink.  Add other decorations if you wish.Timeless Arrangement Bundle
    10. Decorate envelope if you wish.

    Click on the links below to hop with us and please leave a comment.  We will appreciate it.

    Blog Links

    Christy Gridley – USA


    Deirdre Croal – USA


    Julie Golding-Page – Canada


    Karen Beck – Canada


    Theresa McEntee – USA


    Robbie Rubala – USA


    Product List

    Timeless Arrangements Bundle (English)

    Timeless Arrangements Bundle (English)
    [161526]

    Moody Mauve Classic Stampin' Pad

    Moody Mauve Classic Stampin’ Pad
    [161649]

    Moody Mauve Stampin’ Blends Combo Pack

    Moody Mauve Stampin’ Blends Combo Pack
    [161660]

    Basic White 8 1/2" X 11" Cardstock

    Basic White 8 1/2″ X 11″ Cardstock
    [159276]

    Vellum 8-1/2" X 11" Cardstock

    Vellum 8-1/2″ X 11″ Cardstock
    [101856]

    Moody Mauve 3/8" (1 Cm) Textured Ribbon

    Moody Mauve 3/8″ (1 Cm) Textured Ribbon
    [161630]

    Stampin' Cut & Emboss Machine

    Stampin’ Cut & Emboss Machine
    [149653]

    Blending Brushes

    Blending Brushes
    [153611]

    Blender Pens

    Blender Pens
    [102845]
    Add All to Cart

    If you wish other products, SHOP WITH ME on my online store.

    Posted in Annual Stampin' Up! Catalogue, Blog Hops, Cards, Coloring, Occasions, Stampin' Emboss and Die Cut Machine, SU Only Products, Thank You | Tagged bundles, dies, occasions, Stampin Blends, Stampin Up, stamping up, stampingup, stampinup, su

    Say Thank You with the Cheerful Daisies Bundle

    Simply Said With Karen Posted on May 8, 2023 by Karen GilbertMay 9, 2023

    Say “Thank You” with the  Cheerful Daisies will bring a smile to those who see the card.

    Beautifully Happy

    I entered this card into Kylie’s International Blog Hop.  It’s a way to say “thank you” to my readers, customers and Facebook fans.  It’s so important to say the 2 simple words, but sometimes, people forget about them.

    This card is a Book Fold fancy fold card.


    Say Thank YouBeautifully Happy

    Vote for Me Link

    Say Thank You Card Recipe

    Stamp Sets: Cheerful Daisies, Cheerful Sentiments.

    Ink: Copper Clay.

    Paper: (with Measurements)
    Copper Clay 4-1/4″ x 11″ Score at 5-1/2″ and 6-3/4″ along the long edge.  Fold and burnish with Bone Folder, and 3-3/4″ x 3-3/4″
    Fresh as a Daisy Designer Series Paper: 4″ x 4″. 1″ x4″, 1/2″ x  4″.
    Basic White: 3-3/4″ x 3-3/4″. 4″ x 4″ and scrap for sentiment.
    Pretty Peacock: scraps for leaves and twigs.

    Accessories:
    3/8″ Textured Ribbon ( Copper Clay) 4-3/4″ and 3″, 2023-2025 In Colour Dots.

    Tools:
    Stampin’ Cut & Emboss Machine
    Cheerful Daisy Dies
    Blending Brushes

    Basic Supplies:
    Bone Folder
    Stampin’ Seal+
    Tear & Tape Adhesive
    Stampin’ Dimensionals
    Mini Glue Dots
    Clear Blocks  -A B, D
    Simply Shammy or Stampin’ Scrub
    Stampin’ Mist Stamp Cleaner (153648)
    Grid Paper or Small Grid Paper
    Paper Snips
    Paper TrimmerSay Thank you

    Instructions
    1. Fold the card base along score lines.
    2. Attach the DSP to front panel and along the left side.
    3. Adhere the ribbon on top of the DSP on left side.
    4. With Seal + attach the the left side to the inside card base.
    5. Die cut the large attached die (3 daisies) from Copper Clay cardstock.  Trim the leaves off. Die cut leaves and twigs from Pretty Peacock cs.
    6. Use the single daisies and die cut from Basic White cardstock. Color the daisies with a Blending Brush & Copper Clay ink.  Use a very light touch.  Glue these to the Copper Clay daisies.  Use Stampin’ Dimensionals to attach to card front.
    7. Tuck the leaves & twigs behind the daisies. Place the 2023-2025 In Colour Dots in various places.
    8. Stamp a sentiment with Copper Clay ink on scrap of Basic White and place on card front.
    9. Tie the short ribbon on the left had shide using a square knot.
    Inside
    1. Attach the strip of DSP to the left hand side of Basic White Panel.
    2. Stamp a sentiment on the Basic White.
    3. Adhere to inside with Seal+

    Say Thank You

    Sit back and hop around to the rest of the Blogs to see what others are doing to “Say Thank You”.

    Please vote for my card so that I can participate in the the International Blog Hop along with other International Demonstrators.

    Thank you so much  for Voting.

    Are you looking for supplies to create this card?  You can shop by clicking on any image below.

    Product List

    Cheerful Daisies Bundle (English)

    Cheerful Daisies Bundle (English)
    [161297]

    Cheerful Tags Framelits Dies

    Cheerful Tags Framelits Dies
    [141838]

    Copper Clay Classic Stampin' Ink Refill

    Copper Clay Classic Stampin’ Ink Refill
    [161654]

    Copper Clay 8 1/2" X 11" Cardstock

    Copper Clay 8 1/2″ X 11″ Cardstock
    [161721]

    Fresh As A Daisy 12" X 12" (30.5 X 30.5 Cm) Designer Series Paper

    Fresh As A Daisy 12″ X 12″ (30.5 X 30.5 Cm) Designer Series Paper
    [161289]

    Basic White 8 1/2" X 11" Cardstock

    Basic White 8 1/2″ X 11″ Cardstock
    [159276]

    Pretty Peacock 8-1/2" X 11" Cardstock

    Pretty Peacock 8-1/2″ X 11″ Cardstock
    [150880]

    Copper Clay 3/8" (1 Cm) Textured Ribbon

    Copper Clay 3/8″ (1 Cm) Textured Ribbon
    [161629]

    2023–2025 In Color™ Dots

    2023–2025 In Color™ Dots
    [161620]

    Stampin' Cut & Emboss Machine

    Stampin’ Cut & Emboss Machine
    [149653]

    Blending Brushes

    Blending Brushes
    [153611]
    Add All to Cart

    Posted in Annual Catalogue, Blog Hops, Cards, Demonstrator, Sponging, Stampin' Emboss and Die Cut Machine, Thank You | Tagged bundles, demonstrator, dies, occasions, Stampin Up, stamping up, stampingup, stampinup, su

    Lazy Days of Summer with Soft Sunlight and a Rocking Chair

    Simply Said With Karen Posted on May 1, 2023 by Karen GilbertApril 30, 2023

    Lazy Days of Summer are coming and so is a new Bundle. As the Northern Hemisphere moves into summer, with picnics, swimming, relaxing, what could better?


    Lazy Days

    Lazy Days Card Recipe

    Stamps: Lazy Days, Charming Sentiments

    Ink: Boho Blue, Memento Black Tuxedo, Pool Party, Petal Pink, Crumb Cake, Granite Gray, Stampin’ Blends: Sweet Sorbet Combo, Lost Lagoon Combo.

    Paper (including Measurements):
    Boho Blue “- 5-1/2″ x 11-1/2″ scored at 4-1/4″ folded and burnish with bone folder,
    2@ 3/4″ x 5-1/4″ 2023-2025 6 x 6 In Color Designer Series Paper (DSP) and scrap_1/2″ x 4″,
    Basic White: 2 @ 4″ x 5-1/4″, and Scraps, 1@ 5-1/4″ x 3-3/4″
    Smoky Slate: 5-1/2″ x 1-1/2”,
    Sweet Sorbet ( scraps)

    Accessories: 2023-2025 In Color Dots,

    Tools: Stampin’ Blends, Blending Brushes and Stampin’ Emboss & Cut Machine

    Basic Supplies:
    Bone Folder
    Stampin’ Seal+
    Tear & Tape Adhesive
    Stampin’ Dimensionals
    Mini Glue Dots
    Clear Blocks  -A B, C, G, H
    Simply Shammy or Stampin’ Scrub
    Stampin’ Mist Stamp Cleaner (153648)
    Grid Paper or Small Grid Paper
    Paper Snips
    Paper Trimmer


    Lazy Days

    Create the Lazy Days Greeting Card
    1. On the top 2/3 Basic White panel, use the Blending Brushes and Pool Party ink and apply a light layer of ink.  On the bottom 1/3,  use Petal Pink ink and apply ink with the Blending Brushes.
    2. Use Pool Party ink and the cloud stamps, stamp 2 clouds. Use Smoky Slate ink and stamp the lattice at the above the clouds (you will likely need to stamp the lattice twice).
    3. Die cut 2 sets of railing from Smoky Slate cs.  Attach in the center of the panel with Liquid Glue. If the raining does not go across the panel, cut a piece from the second railing and attach.
    4. Stamp the leaves and flowers in the hanging pot with Memento Ink.  Die cut with matching die,  Color using the Lost Lagoon and the Sweet Sorbet Blends.
    5. Stamp the rocker and table with Memento ink.  Die cut with matching dies and color using the Crumb Cake Blends and the  drink with Sweet Sorbet.
    Assemble the Image Pieces
    1. Stamp the rug with Boho Blue ink and die cut with matching die.  Die cut the pillow from Sweet Sorbet cs.  On the bottom of the image panel, stamp the lines the looks like wood floor in Smoky Slate ink. Attach the rug to the floor with Liquid Glue, the table and rocking chair with Dimensionals.
    2. Attach the hanging  basket with a Mini Dimensional just below the lattice.
    3. Stamp  2 lines of sentiments on Basic White cs with Boho Blue ink. Cut the pieces close to the stamping so that the strip is 3/8″ wide.  Attach to the panel with Mini Dimensionals.
    4. Place 3 embellishments on the card front.
    5. Attach the 2 strips of DSP to the top and bottom of the image panel with Seal+. Use Seal+ to the card front.
    6. On the inside panel, attach the strip of DSP to the right hand side with Seal+, Stamp the basket and greenery with Memento Tuxedo ink, color using Lazy Lagoon and Crumb Cake Blends.

    Now it’s your turn to sit back, and relax and admire your card.  You have done a great job. remember it’s the Hazy Lazy Days of summer.

    Remember, you can start ordering from the 2023-2024 Annual Catalogue on May 2, 2023.  Contact me, if you want me to put in your order, or SHOP WITH ME on my online store.

    Posted in Annual Catalogue, Cards, Coloring, General, Sneak Peeks | Tagged bundles, dies, occasions, Sneak Peek, Stampin Blends, Stampin Up, stamping up, stampingup, stampinup, su

    2023-2025 In colours and Carry Forward Products

    Simply Said With Karen Posted on April 25, 2023 by Karen GilbertApril 26, 2023


    2023-2025 In Colours and  Carry Forward Products

    2023-2025 In Colours and the carry forward products give you an opportunity to expand your horizons. Why would you want to do that? Don’t you want more new product?

    We all want new products, especially stamps, paper & ink.  But sometimes that is just not doable.  It’s great to use whatever you have on hand and look at ways to incorporate the new with the old.

    It’s the Inspirations in Ink Blog Hop time again and yes, we like to give you inspiration.  The group is made up of a group of Stampin’ Up! demonstrators from various countries and we want to inspire you with new ideas and new ways of using your products.

    You will find all the links at the bottom of the post so that you can hop along and see what others are doing. Thank you for hopping with us.

    For this hop, I am focusing on the Dainty Delight Bundle (stamp & dies).  You will not be able to purchase the stamp set & dies as a bundle from the 2023-2024 Annual Catalogue.  However, you can purchase as a bundle until May 1st and receive the 10% discount. Use this LINK

    Recipe for Dainty Delight Card

    Stamp: Dainty Delight Stamp

    Inks; Crumb Cake. Blueberry Bushel

    Paper (with cutting measurements):

    • Card Base – Thick Basic White 8 ½” x 5 ½”, scored @ 4 ¼”
    • Fresh as a Daisy DSP (Boho Blue) 5-1/2” x 4-1/4”
    • Old Olive 5″x 2-1/2″
    • Early Espresso – Scraps
    • Blueberry Bushel – 2-1/2” x 7”
    • Vellum  – 3-1/2” x 4”
    • Daffodil Delight – Scraps
    • Basic White 4” x 3-3/4”, scraps
    • Crumb Cake Scraps
    • Basic White (Card Inside) 4” x 5-1/4”

    Accessories: Iridescent Pearls, White Bakers Twine, Soft Seafoam Light Stampin’ Blends , Boho Blue Light Stampin’ Blends.

    Tools: Stampin’ Blends Stampin’ Emboss & Cut Machine

    Basic Supplies:
    Bone Folder
    Stampin’ Seal+
    Tear & Tape Adhesive
    Stampin’ Dimensionals
    Mini Glue Dots
    Clear Blocks  -B, C, D, E
    Simply Shammy or Stampin’ Scrub
    Stampin’ Mist Stamp Cleaner (153648)
    Grid Paper or Small Grid Paper
    Paper Snips
    Paper Trimmer

    INSTRUCTIONS:

    1. Fold Card Base in half along score line prior to burnishing with Bone Folder.
    2. Use Blueberry Bushel ink to stamp the open leaves in 4 places. Adhere DSP to Basic White Cardstock with Stampin’ Seal+ or Multipurpose Liquid Glue.
    3. Die cut Vellum with the 3rd largest die from the Scalloped Contour Die set. Emboss with the Stripes & Splatters Embossing Folder. Trim the right-side scallops 3-1/2” (9cm) to make a clean end. Adhere the Vellum with Glue Dots in each corner.  Line up the straight edge with the edge of the card.
    4. Die cut the following:
      1. Vine from Old Olive cs
      2. 3 sets of leaves from Blueberry Bushel,
      3. 1 full daisy and 1 half daisy from Daffodil Delight
      4. 2 daisy centers from Early Espresso.
    5. Stamp the clump of leaves and flowers on the Basic White cs with Crumb Cake ink. Die cut with coordinating die.
    6. Colour with the following Stampin’ Blends:
      1. Flowers: Boho Blue Light,
      2. Leaves: Soft Seafoam Light.
    7. Start laying out the pieces and attach them to the card front. (See image for placement) Layer the pieces as follow:
      1. Use Multipurpose Liquid Glue to attach Vine.
      2. Attach the leaves & flowers pieces over the Vine with Stampin’ Dimensionals.
      3. Tuck the Blueberry Bushel leaves behind the floral and leaves. Attach with Glue Dots.
      4. Attach the Daffodil Delight leaves, the daisies and the flower centers with Multipurpose Liquid Glue.
    8. Stamp sentiment on Crumb Cake cs with Crumb Cake ink. Die cut with Hexagon Die from the Something Fancy Die set. Use Liquid Glue to attach the left side and a dimensional on the right side.  This will balance out the hexagon.
    9. Use the Take Your Pick Tool and make a hole at the top of the hexagon. Insert a length of  White Bakers Twine through the hole and tie a blow.
    10. Attach the Iridescent Pearls in various places on the card front.
    11. Decorate a piece of Basic White Cardstock prior to adhering to inside of Base Card.
    12. Decorate a Basic White Envelope by stamping an image lower bottom left of front.

    So, give this card a try and see if you can use the 2023-2025 In Colour and the carry forward products.  You may even surprise yourself.

    Robbie Rubala – USA


    Vicky Wright – Australia


    Christy Gridley – USA


    Deirdre Croal – USA


    Julie Golding-Page – Canada


    Karen Beck – Canada


    Rebecca Nutley – Australia


    Theresa McEntee – USA


    If you would like to purchase items that I used in this card, please visit MY SHOPPING STORE

    If you don’t have a Stampin’ Up! demonstrator or a 2023-2024 Catalogue, please email me at karen@simplysaidwithkaren.com 

    Canadian addresses only.


    Posted in Annual Catalogue, Blog Hops, Cards, Jan - April Mini Catalogue, Stampin Up, Stampin' Emboss and Die Cut Machine | Tagged bundles, colouring, dies, Encouragement, occasion cards, occasions, Simply Said With Karen, Sneak Peek, Stampin Blends, Stampin Up, stamping up, stampingup, stampinup, su

    New 2023-2025 In Colors Introduced and a Sneak Peek

    Simply Said With Karen Posted on April 18, 2023 by Karen GilbertApril 18, 2023

    New 2023-2025 In Colors introduced as we get closer to the release of the 2023-2024 Annual Catalogue.  Not only that, a color refresh and 10 colors are being introduced into the catalogue.  These colors are new or returning colors. Of course, we all love a sneak peek and I chose to use the 2023-2025 In Color, Wild Wheat.  This color is similar to the former mustard.  Note, I said similar, which means that there are other tones included like gold.  It’s rich and bold.  It happens all the time when new colors are introduced.

    Let’s talk about the 2023-2025 In Colors.

    The 5 colors are relatively neutral and will fit with the Stampin’ Up!’s  core colors.  The last couple of years, we have seen some bright colors.  These colors are muddy and  will welcome them to the palette.  These colors are on-trend and you will notice them in lots of places: décor, clothing, etc.


    New 2023-2025 In Colors Introduced

    Cheerful Daisies Card Recipe

    Stamps: Cheerful Daisies.

    Ink: VersaMark, Wild Wheat.

    Paper (including Measurements):
    Basic White – 8-1/2″ x 5-1/2″
    Winter Wheat – 4-1/4″ x 5-1/2″, scraps for sentiment.
    Early Espresso – 4″ x 5-1/4″.
    Fresh as a Daisy Designer Series Paper- panel with the white daisies (cut down to 3-7/8″ x 5-3-8″.

    Accessories: Basic Stampin’ Emboss Powder (White), Brushed Brass Butterflies), Banners Pick a Punch.

    Tools:

    Basic Supplies:
    Bone Folder
    Stampin’ Seal+
    Tear & Tape Adhesive
    Stampin’ Dimensionals
    Heat Tool
    Clear Blocks A, B, D

    Simply Shammy or Stampin’ Scrub
    Stampin’ Mist Stamp Cleaner (153648)
    Grid Paper or Small Grid Paper
    Paper Snips
    Paper Trimmer
    Clear Blocks A, B, D

    Instructions:

    1. Card Base: Basic White cs: score at 4-1/4″ and burnish with Bone Folder.
    2. Attach Winter Wheat panel to card based with Seal+
    3. Use Seal+ Adhesive to attach the DSP panel to the Early Espresso cs. Attach all to the Winter Wheat panel.
    4. Stamp sentiment on Winter Wheat scrap with VersaMark.  Sprinkle with White Emboss Powder and heat set with Heat Tool.
    5. Punch with the Banners Pick a Punch and  attach to the bottom of card front with Stampin’ Dimensionals.  Place 3 Brushed Brass Butterflies on the card front.
    6. On the  inside, stamp a greeting and a small daily  in Winter Wheat ink.

    Check out all the new and returning colors and in my next blog post, I will give information about the 10 colors.

    You won’t be able to purchase these products until May 2nd, 2023.

    Versamark Pad

    Versamark Pad
    [102283]

    Basic White 8 1/2" X 11" Cardstock

    Basic White 8 1/2″ X 11″ Cardstock
    [159276]

    Early Espresso 8-1/2" X 11" Cardstock

    Early Espresso 8-1/2″ X 11″ Cardstock
    [119686]

    Basics Embossing Powders

    Basics Embossing Powders
    [155554]

    Brushed Brass Butterflies

    Brushed Brass Butterflies
    [158136]

    Banners Pick A Punch

    Banners Pick A Punch
    [153608]
    Add All to CartGet Your Last Chance Items Before They Are Gone

    Use link to shop the products SHOP WITH ME  

    Have questions? Please contact me at karen@simplysaidwithkaren.com


    Posted in Annual Catalogue, Cards, Free Shipping, General, Retiring Products, Sneak Peeks, Stampin Up, Stampin' Emboss and Die Cut Machine | Tagged occasions, Sneak Peek, Stampin Up, stamping up, stampingup, stampinup, su

    Botanical Layers Bundle on the Last Chance List

    Simply Said With Karen Posted on April 13, 2023 by Karen GilbertApril 13, 2023

    Botanical Layers Bundle on page 93 of the 2022-23 Annual Catalogue is on the the Last Chance List.  It is the bundle that is discontinued, however the stamp set will be in the new catalogue.

    But, you still have a chance to get the the vellum paper that is part of the bundle.

    Botanical Layers

    Botanical Layers Recipe

    Stamps: Botanical Layers, Various Sentiment Stamps

    Ink: StazOn Jet Black, VersaMark, Polished Pink, Daffodil Delight, Orchid Oasis, Starry Sky, Fresh Freesia, Evening Evergreen, Rich Razzleberry.

    Papers: Polished Pink, Rich Razzleberry, Basic White, Awash in Beauty Designer Series Paper, Coastal Cabana, Lovely Layers Vellum.

    Accessories: Stampin’ Cut & Emboss Machine, Fern 3-D Embossing Folder, Deckled Rectangles, Double Oval Punch, Coastal Cabana Sheer Ribbon (Discontinued), Fresh Freesia, Open Weave Ribbon, Starry Night Metallic Woven Ribbon, Stampin’ Emboss Powders (white)

    Basic Supplies:
    Bone Folder
    Stampin’ Seal+
    Tear & Tape Adhesive
    Stampin’ Dimensionals

    Simply Shammy or Stampin’ Scrub
    Stampin’ Mist Stamp Cleaner (153648)
    StazOn Cleaner
    Grid Paper or Small Grid Paper
    Paper Snips
    Paper Trimmer

    If you don’t have the Lovely Layers Vellum, you can use StazOn Ink to stamp images on Vellum.  Just let the ink dry before attaching to cardstock as vellum does not absorb the ink.

     A Card
    1. Whisper White card base is 8-1/2″ x 5-1/2″ scored at 4-1/4″ and burnished.
    2. Emboss a Basic White ( cs panel with the Fern 3-D embossing folder.
    3. On a piece plain of 3-3/4″ x 5″ Vellum, stamp various leaves, blushes & twigs with Orchid Oasis, Evening Evergreen, Fresh Freesia and Starry Night inks.  See image for placement.  Attach to a Basic White panel (cut 3-3/4″ x 5″) with Glue Dots on the 4 corners.
    4. Stamp a sentiment on a scrap of Basic White cs. Die cut with the smallest Deckled Die
    5. Tie 2 bows with the Starry Night ribbon and the Fresh Freesia  Ribbon.  Stack one on top of the other with Glue dots and tuck behind the sentiment panel.
    B Card
    1. Rich Razzleberry card base is 8-1/2″ x 5-1/2″ scored at 4-1/4″ and burnished.
    2. Stamp a vellum panel with the twig stamp using VersaMark. (Use the one with gray & black design..  Emboss with White Emboss Powder and heat with Heat Tool. If you don’t have the Lovely Layers Vellum, then color the vellum with different colors of dark ink with a Blending Brushes.
    3. Coastal Cabana cs panel 4″ x 5-1/4″
    4. Attach this layer to the Coastal Cabana cs layer with Glue Dots in the 4 corners.  Tie the Coastal Cabana Sheer Ribbon around the 2 layers and attach to the card base.
    5. Stamp a sentiment on Basic White with Rich Razzleberry ink and punch with the smooth edge punch.  Use the Scalloped Edge punch and punch an oval from Rich Razzleberry cs scraps. Attach the white oval to the Rich Razzleberry with Seal+ and attach to card base with Dimensionals.
    C Card
    1. Card Base is Polished Pink cs 8-1/2″ x 5-1/2″ score at 4-1/4″ and fold.
    2. Die cut a panel of Polished Pink cs – 4-1/4″ x 5-1/2″.  Use 2 largest Deckled Dies and nest them on the cs panel to form a frame.
    3. Cut a piece of Designer Series Paper at 3-3/4″ x 5″. Use a vellum panel that has an image (lop-sided circle) or make your own.  Attach to the DSP with Glue Dots in the 4 corners of the vellum.
    4. Stamp the sentiment on the Vellum with Polished Pink Ink.  Again let dry or use the Heat tool.
    5. Place Stampin’ Dimensionals on the Polished Pink frame and attach to Vellum panel.
    6. Attach embellishment dots to the card front.

    So, if you want to try these techniques on Vellum then you can purchase the Botanical Layers bundle on my ONLINE Store. 

    You can view the Last Chance products by using this LINK

    If you have any questions, you can contact me at karen@simplysaidwithkaren.com


    Posted in Cards

    Cottage Rose and Technique for the Inspirations in Ink Blog Hop

    Simply Said With Karen Posted on March 28, 2023 by Karen GilbertMarch 28, 2023

    Use the Cottage Rose stamp and Technique for Inspirations in Ink Blog Hop.  Yes, it’s that time.  This month’s theme for the blog hop is a technique using various coloring tools.  And, Stampin’ Up! has given us a multitude of tools.

    I choose the Watercolor Pencils and the Stampin’ Blends Color Lifter.  I will talk about the advantages of using the color lifter further into the post.

    This month I am participating in the Inspirations in Ink March Blog Hop.  You will find the links at the end of this post.  Please join us and see what the other demonstrators are up to.

    Cottage Rose & TechniqueCottage Rose and a Technique

    Cottage Rose Colouring Technique Card Recipe

    Stamps: Cottage Rose, Here’s a Card.

    Inks: Tuxedo Black Memento, Flirty Flamingo, Watercolor Pencils: Assortment 1 (Daffodil Delight). Assortment #2 (Night of Navy, Flirty Flamingo, Garden Green), Stampin Blends Color Lifter.

    Paper: Basic White Thick, Basic White, Flirty Flamingo, Night of Navy, Hello Irresistible Designer Series Paper.

    Accessories:  Stampin’ Cut & Emboss Machine, Cottage Flower Dies, Adhesive Backed Milky Dots, Night of Navy 3/8″ Bordered Ribbon, Happy Labels Pick a Punch.

    Tools:

    Basic Supplies:
    Bone Folder
    Stampin’ Seal+
    Tear & Tape Adhesive
    Stampin’ Dimensionals

    Simply Shammy or Stampin’ Scrub
    Stampin’ Mist Stamp Cleaner (153648)
    Grid Paper or Small Grid Paper
    Paper Snips
    Paper Trimmer

    How to Technique

    1. Stamp the single flower, leaves, 3 cluster flowers with Tuxedo Black Memento Ink
    2. Color the images with the chosen Watercolor colours. (see image above) Color the flowers at the bottom (don’t go to the tips with the color) Now take the Blends Color Lifter and draw the color up. There can be white spaces on the petals as this make them look real.
    3. Die cut with coordinating dies from the Cottage Flower Dies.
    4. Die cut 2 extra leaves from Night of Navy cs.
    5. Arrange the cuts outs and then attach with Multipurpose Liquid Glue, Glue Dots and/or Stampin’ Dimensionals.Cottage Rose and a Technique

    You can find all the details instructions in Aprils’ Inspiration in Ink Tutorials created by a group of 9 Stampin’ Up! Global Demonstrators.

    There are 2 ways to get this tutorial:

    • A minimum of $50.00 order from my ONLINE STORE 
    • You can also EMAIL ME
    • Purchase the tutorial for $20.

    Cottage Rose and a Tutorial

    Why I Love the Blends Color Lifter

    • The blends color lifter are Basic White compatible.  Basic White is refined many times during the process of making this paper.  That is why the paper is smooth compared to the other colored cardstock.  Try it for yourself.
    • It will not pill the paper.  Many other tools will pill the paper if you go back and forth too many times.

    Blog Hop Links below Please join us and see what others are creating. You are at Karen Beck Gilbert the next one is  Rebecca Nutley.

    Theresa McEntee – USA


    Robbie Rubala – USA


    Vicky Wright – Australia


    Christy Gridley – USA


    Deirdre Croal – USA


    Julie Golding Page – Canada


    Karen Beck – Canada


    Rebecca Nutley – Australia

    Product List

    Cottage Rose Bundle (English)

    Cottage Rose Bundle (English)
    [159048]

    Here's A Card Cling Stamp Set (English)

    Here’s A Card Cling Stamp Set (English)
    [149438]

    Tuxedo Black Memento Ink Pad

    Tuxedo Black Memento Ink Pad
    [132708]

    Flirty Flamingo Classic Stampin' Pad

    Flirty Flamingo Classic Stampin’ Pad
    [147052]

    Watercolor Pencils

    Watercolor Pencils
    [141709]

    Watercolor Pencils Assortment 2

    Watercolor Pencils Assortment 2
    [149014]

    Stampin' Blends Color Lifter

    Stampin’ Blends Color Lifter
    [144608]

    Basic White 8 1/2" X 11" Thick Cardstock

    Basic White 8 1/2″ X 11″ Thick Cardstock
    [159229]

    Basic White 8 1/2" X 11" Cardstock

    Basic White 8 1/2″ X 11″ Cardstock
    [159276]

    Flirty Flamingo 8-1/2" X 11" Cardstock

    Flirty Flamingo 8-1/2″ X 11″ Cardstock
    [141416]

    Night Of Navy 8-1/2" X 11" Cardstock

    Night Of Navy 8-1/2″ X 11″ Cardstock
    [100867]

    Hello, Irresistible 6" X 6" (15.2 X 15.2 Cm) Designer Series Paper

    Hello, Irresistible 6″ X 6″ (15.2 X 15.2 Cm) Designer Series Paper
    [161139]

    Stampin' Cut & Emboss Machine

    Stampin’ Cut & Emboss Machine
    [149653]

    Cottage Flowers Dies

    Cottage Flowers Dies
    [159047]

    Adhesive Backed Milky Dots

    Adhesive Backed Milky Dots
    [160582]

    Night Of Navy 3/8" (1 Cm) Bordered Ribbon

    Night Of Navy 3/8″ (1 Cm) Bordered Ribbon
    [160581]

    Happy Labels Pick A Punch

    Happy Labels Pick A Punch
    [160693]
    Add All to Cart

    Posted in Cards, Catalogues, Feminine, Occasion Cards, Techniques | Tagged Birthday, demonstrator, dies, occasions, Stampin Blends, stamping up, stampinup, su, Techniques

    Post navigation

    ← Older posts
    Newer posts →

    • Facebook
    • Instagram
    • Pinterest
    • YouTube

    Event Calendar

    Categories

    Painted Lavender

    Inspirations in Ink January 2024 Tutorial. Earn this tutorial for free when you order totals $50.00 or more.
    Tutorials are designed by Global Stampin' Up! Demonstrators.
    Contact me if you wish to purchase the tutorial. mailto:karen@simplysaidwithkaren.com

      ©2024 - Simply Said With Karen - Weaver Xtreme Theme Privacy Policy
      ↑ Scroll Up
      Verified by MonsterInsights