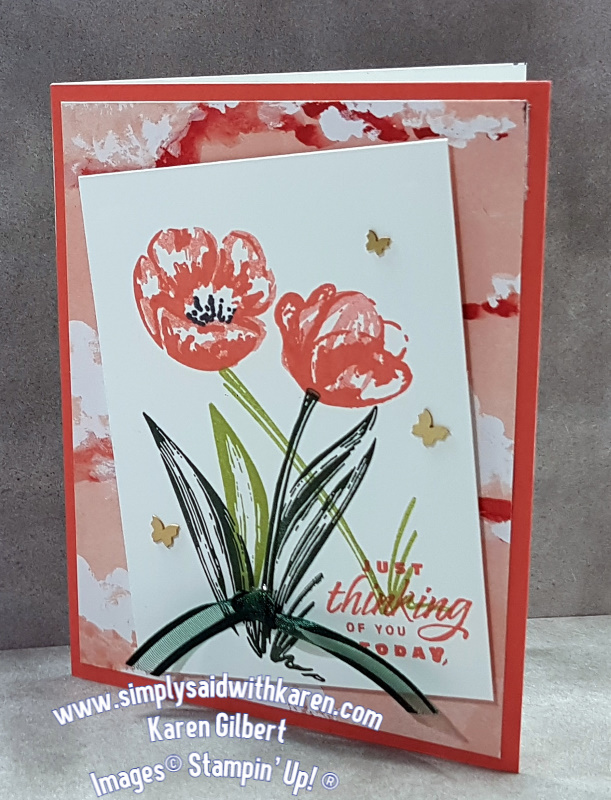
Tulips Poke their Heads Through the Earth – It’s a sure sign of Spring
Tulips poke their heads through the dirt to welcome Spring. It’s a sure sign that more flowers will be coming. Spring is a period of renewal and we all look forward to the time when the snow disappears, the air warms up and the smell of freshly cut grass.
Now we can create cards and other projects with the Flowering Fields Suite. The Suite consists of Flowering Tulips Bundle, Tulips Fields Bundle., Flowering Fields Designer Series Paper, Evening Evergreen Window Paned Check Ribbon, and Brush Brass Butterflies.
This is a pretty impressive bundle.
Tulip Spring Card Recipe
Stamp Set: Tulip Fields
Ink: Calypso Coral, Tuxedo Black Memento, Evening Evergreen, Pear Pizzazz.
Paper: Basic White, Calypso Coral, Flowering Fields Designer Series Paper.
Accessories: Stampin’ Cur & Emboss Machine, Tulip Dies, Evening Evergreen 3/8″ Open Weave Ribbon, Brushed Enamel Shapes.
Measurements
Basic White :5-1/2″ x 8-1/2″ Score at 4-1/4″ and burnish with the Bone Folder, 3-1/4″ x 4-1/2″.
Calypso Coral: 4-1/4″ x 5-1/2″.
Flowering Fields Designer Series Paper: 4″ x 5-1/4″
Ribbon: 5″
The stamp set is a 2-step stamp, which means that you can stamp 2 different stamp over each other and get depth in your colors. Sometimes you can use 2 different colored inks, a light color and a dark color, or the same color, one stamp at full ink strength and the other stamp, inked and stamped off. General you stamp the lighter color on the stamp with less details and the darker color on the stamp with more detail. Clear as mud, right? Now if the stamps are photopolymer, then it is easy to line up the 2 stamps, if the stamps are cling, then I recommend using the Stamparatus to align the stamps.
Create the Card
- Stamping the open tulip and the closed tulip:
- Stamp the more detailed tulip stamp with Calypso Coral ink on the smaller Basic White Panel. Ink up the less detailed stamp with Calypso Coral and stamp off on scrap paper, to remove some ink from the stamp. Now, without reinking, line up the stamp over the previous image and stamp. (see placement on photo above)
- Ink the stem in Pear Pizzazz and stamp at the bottom of the open tulip. Stamp the bit of grass at the bottom of the stem with Pear Pizzazz. Clean stamp and then ink with Evening Evergreen and angle the stamp and stamp at the bottom of the closed tulip. Again clean the grass stamp and stamp with Evening Evergreen ink at bottom of the evergreen stem.
- Finally, stamp 2 small leaves, one in Pear Pizzazz and 1 large leaf in Evening Evergreen ink.
- Stamp a sentiment with Calypso Coral ink on the bottom right Basic White panel.
- Attach the DSP to the Calypso Coral card base and then Adhere your focal image on an angle to the DSP.
- Tie a knot in the ribbon and trim ends. Adhere to stem bottoms with Glue Dots.
- Adhere 2 larger butterflies and 1 smaller butterflies to image panel.
Finish Up and Decorate Your Envelope
Decorate the inside of your card. Use a strip of DSP and/or stamp an image. Perhaps you can also stamp that image on your envelope.
If you would like to create this card, you can still order the stamp and dies as a bundle. Once the 2022 Jan- June Mini catalogue expires at the end of June, you will need to purchase separately.
Watch the Tulips poke their heads through the earth to welcome Spring
Please leave me a comment provide me with feedback on the card.
SHOP WITH ME for the products/suite at my Online Store. You can purchase the items individually by heading over to my ONLINE STORE
If you have any questions, please EMAIL ME


Gorgeous card Karen!