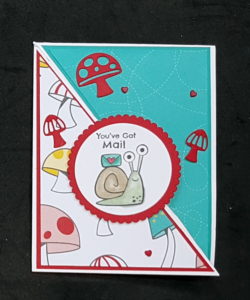
Triangle Fun Fold Card Uses Last Chance Items – Snail Mail Suite
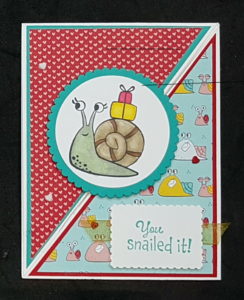
The Triangle Fun Fold Card is something new or at least new to me ,to stretch your creativity and it’s not hard to do. Actually, the fun fold can save you some time as you will cut and score 2 cards at the same time. The Snail Mail Suite is so sweet, ok, pun intended, and it is suitable to big and little people, and older or younger people. You will notice I didn’t write old people. So many of our elders are young and heart and would love a card like this one. There is only 1 little tricky bit but I will get to that further on down – nothing to worry about, you can do it.
Snail Mail Card Recipe
Supplies
Stamp Sets: Snailed It.
Inks: Memento Black Tuxedo, Pool Party
Paper: Basic White, Bermuda Bay, Real Red, Snail Mail Designer Series Paper.
Accessories: Stampin’ Cut Emboss Folder, Snail Dies, Layering Circle Dies, Stampin Blends: Dark Daffodil Delight, Crumb Cake Duo, Light Real Red, Bronze, Light Seafoam, Rectangular Postage Stamp Punch, Resin Hearts.
Cutting Measurements
Basic White: – 8-1/2″ x 11″, 3″ x 3″,, Scrap.
Bermuda Bay: 4″ x 5-1/4″, 3-1/2″ x 3-1/2″.
Real Red: 4″ x 5-1/4″
Snail Mail Designer Series Paper: 4: x 5-1/4″. Use two different patterns. Make sure that one or both pattern patterns are suitable to be turned in any direction and will still work. A one-way pattern. will result in one panel being upside down.
Card Assembly
- You will have enough material to make 2 cards.
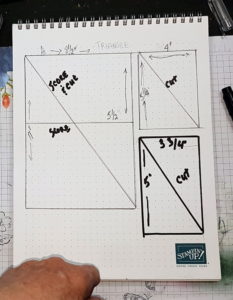
- Score the 8-1/2″ x11″ cardstock at 5-1/2″, on the 11″ side, turn and score at 4-1/4″, as per sketch.
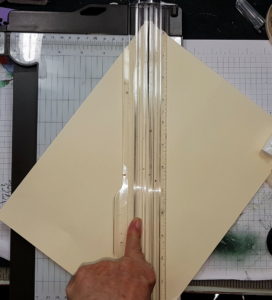
- Line up the cardstock in the cutter with one corner in the top cutter groove and the opposite corner in bottom cutter groove. You will need to wiggle the paper so that the dot at the center where the 2 score lines intersect. Now, cut the cardstock. You will likely have to use a pair of scissors to finish cutting to the corners.
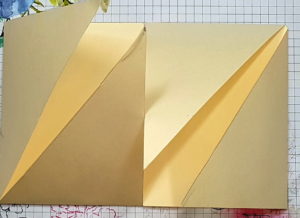
- Fold and burnish the score line at the 4-1/4″.
- Prepare the panels for the triangle card base. Cut the designer series paper and the cardstock panel , corner -to-corner. If you are using a pattern paper with a design going up or down, you are going to have to have 2 pieces of designer series paper and/or cardstock.
- If you don’t want to worry about the pattern direction, use a pattern that is not directional.
- Now it’s times to create the art image.
- Stamp the snail or other image on the Basic White and die cut with Layering Circle Dies. Cut a scalloped circle 2 sizes larger from the Real Red card stock.
- Use the Stampin’ Blends to colour the snail. You can also use the Stampin’ Write Markers or the Pencil Crayons and the Blender Brush or ink and the water brushes. The choice is yours.
- Attach the small circle and the large circle with Multi-Purpose Liquid Glue or Stampin’ Seal.
- Use Stampin’ Dimensionals to attach the art image to the card front. Put the dimensionals on the left-hand side of the circle. This prevents the circles being attached the right triangle.
- Attach several hearts from the Resin Hearts embellishment to the card front and finish the inside with a sentiment or another strip of Designer Series Paper.
- You can stamp a sentiment on Basic White cardstock and punch with the Rectangular Postage Stamp Punch.
So, there you have it, a triangle fun fold card created using Last Chance Products.
Have a Wish List, or you might like to try stamping and creating, use the Shop with Me link to go to my On-Line Store.

