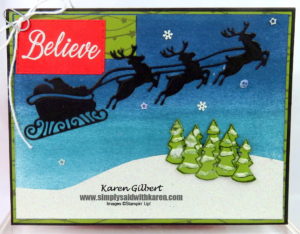
The Magic of Christmas Eve – Up, Up and Away Create Your Own Magic
The importance of the magic of Christmas Eve is so important for many of us. Whether you are young, older or somewhere in between.
Who remembers the excitement that we experienced as Christmas Eve drew nearer and nearer. And now are parents, grandparents or great grandparents, we get to watch the little ones. Remember the lights and how they twinkled on the tree? Or, how about sitting next to the tree and trying to determine which gift was for you. We spend time with families or friends, perhaps carolling, or eating the turkey or just relaxing.
Did you read “T’was the Night Before CHristmas and All THrough The House, Not a Creature was Stirring, Not Even a Mouse” ? The excitement was building! Then it was time for bed. Did you hear a noise on the roof, maybe Santa and his Reindeers have landed. Time to close the eyes.
The Night Before Christmas Suite is sure to have you reliving that feeling.
Magic Night Card Recipe
Stamp Set: Holly Jolly Christmas*.
Ink: Tuxedo Black Memento, VersaMark, Night of Navy.
Paper: Basic Black, Whisper White, Sparkle Glimmer, Poppy Parade, Night Before Christmas Designer Series Paper (DSP).
Accessories: Embossing Die Cutting Machine, Jolly Season Dies*, Whisper White Baker’s Twine, Snowfall Accents Puff Paint, Stampin’ Blends: Old Olive Duo, White Stampin’ Emboss Powder, Snowflake Sequins, Brayer.
*order as a bundle and receive a 10% discount.
Creative Details
Cutting Measurements:
- Basic Black cs: card base: 8-1/2″ x 5-1/2″ score at 4-1/4 fold and burnish with Bone Folder, Santa sleigh and reindeer: 5″ x 3-1/2″.
- Night Before Christmas DSP: 4″ x 5-1/2″ ,scrap.
- Whisper White cs: 3-3/4″ x 5, scraps for trees.
- Poppy Parade, scrap
- Sparkle Glimmer: 2″ x 5″. Cut or tear paper to resemble snow banks.
Assembly:
- Load up a Sponge Brayer with Night of Navy ink. Create a night sky by rolling the ink on the Whisper White cs.
- Tip: Start off the cs and at the top of the Whisper White. Keep rolling the brayer so that you will get the night sky going from dark to light. Try not to reink the brayer before you are finished rolling. This will create lines in the sky.
- Layer the cut Sparkle Glimmer paper at the bottom of the brayered sky.
- Die cut the Santa’s Sleigh and Reindeer from Basic Black.
- Stamp 2 sets of trees on Whisper White cs. Colour with Old Olive (light and dark) Stampin’ Blends and die cut. Trim the trees with the Snowfall Accents Puff Paint and heat set with Heat Tool.
- Tip: Be careful when applying the paint as it is quite runny. Don’t hold the bottle upside down and don’t squeeze the bottle. Apply to the trees and heat with Heat Tool until the paint puffs. Watch the paint so it does not burn.
- Attach the trees to the top of the snow hill.
- Layer the piece of DSP to top left hand corner. Attach Santa’s sleigh and reindeer to the the sponged sky.
- Stamp “Believe” on the Poppy Parade cardstock with VersaMark. Sprinkle with White Emboss Powder and heat set. Adhere to DSP and tie a bow with the Whisper White Baker’s Twine.
- Attach a few Snowflake Sequins around the sky.
- Tip: Put tiny dabs of glue in different places on the sky an use the Pick Me Up Tool to pick up sequins and apply to the glue dabs.
TaDa!!, You now have your very own card to celebrate the Magic of Christmas Eve.
To Purchase Any Products for the Magic of Christmas Eve Card
Do need products to create this card? Click on any of the supplies in the product list and you will be taken to my ONLINE STORE where you can place your order. Or, you can email me with your order at karen@simplysaidwithkaren.com


