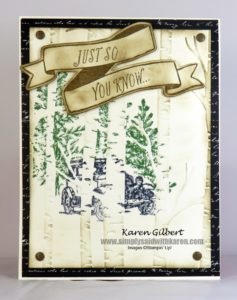
Stamp Emboss Technique Creates a Unique Card
Stamp Emboss Technique
Have you ever tried the stamp emboss technique? This technique has become popular over the past year. I have tried several time to use this technique but have not been happy with the outcome. This time, the embossed card stock turned out exactly how I envisioned the process. There is a bit of a learning curve, so I guess practice makes perfect.
First, I will show you the card and then explain how to do this technique.
Recipe
Stamps: Guy Greetings, Lovely as a Tree, Banners for You.
Ink/Markers: Tuxedo Black Memento, Garden Green, Soft Suede.
Paper: Very Vanilla, Going Places DSP Stack
Accessories: Big Shot, Woodland Embossing Folder, Bunch of Banners Framelits, Neutral Candy Dots.
The “How To”
The first step is to decide where you want your image to land on the cardstock after it has been embossed. A few things to remember: before stamping the image on your embossing folder , decide if you want the embossed side or the debossed side to hold the image. Because, I wanted the birch trees to stand out, I stamped the embossed side of the embossing folder.
***TIP: The words ” Stampin’ Up!” on the embossing folder indicate that this will be the side to stamp your image.
Stamp the car image from the Guy Greetings stamp set using the Tuxedo Black ink on a post it note, ink the stamp again and stamp on the Woodlands Embossing Folder.
***TIP: Remember that the image will be reversed when you run the Embossing Folder through the Big Shot. For example if you stamp on the right side of the embossing folder, your image will end up on the left side of your cardstock.
Cut out the car image that is stamped on the Post-It-Note, because it will be used as a mask. Lay on top of the stamped car image. Now, stamp the Evergreen Tree from the Lovely as a Tree stamp set using Garden Green ink. This technique makes the trees from part of the background to the birch trees.
There , that is what the Stamp Emboss Technique is about. This can be used a different stamps and embossing folders depending upon the look you are wanting on your card.
FINISH
Now, layer your panel: card base, DSP, and art panel. Before adding the art panel, I did sponge a bit of the soft suede ink on the birch trees and around the Very Vanilla panel.
Stamp your sentiment on a piece of Very Vanilla, using the sentiments of your choice from the Thoughtful Banners stamp set and die cut using the Bunch of Banners Framelits. Sponge the sentiment banners using Crumb Cake ink.
Give the Stamp Emboss Technique a try and let me know how you made out. I would love it if you left a comment.
Product List


