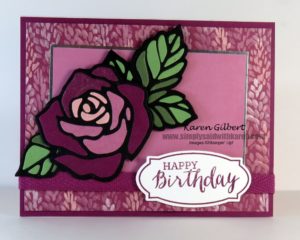
Rose Stained Glass Birthday Card
Rose Stained Glass
Did you know that you can create a rose stained glass birthday card using the Rose Garden Thinlits? And guess what, it is not as hard as I thought it would be. There are several steps in the process. However, I will let you know about easy techniques to get the right colours in the right places.
I was reluctant to try this technique as attaching the many small pieces seemed daunting. But I like the effect and I’m sorry that I didn’t try it sooner.
Recipe
Stamps: Rose Wonder.
Ink/Markers: Rich Razzleberry.
Paper: Whisper White Thick, Whisper White, Basic Black, Rich Razzleberry, Sweet Sugarplum, Always Avocado, Wild Wasabi, Blushing Bride, Blooms and Bliss DSP, Silver Foil.
Accessories: Big Shot, Rose Garden Thinlits, Rich Razzleberry Cotton Ribbon, Wink of Stella Clear.
Here are the instructions for creating the stained glass.
- Choose at least 3 coordinating colours for the rose. I choose to work with Blushing Bride, Sweet Sugarplum and Rich Razzleberry.
- Cut the rose from Basic Black Blushing Bride, Sweet Sugarplum and Rich Razzleberry.
- Discard the little pieces from the Basic Black rose, so that you are left with the outline.
- Try to preserve the roses cut from the coloured cardstock. This will help with your placement of the different colours.
- Attach the Basic Black rose outline to a scrap of Basic Black. This will form the foundation for you coloured pieces. Cut around the outline.
- Decide how you want to place the colours – dark to light or the other way around. I started with the Rich Razzleberry.
- Match the black spaces with the pieces cut in the various roses. Place glue on the blank spaces. I used Multipurpose Liquid Glue and carefully dotted the glue on. Only do a few at a time so the glue doesn’t dry before everything is down.
- Carefully remove the coloured pieces using the paper piercer and place it in the matching basic black space. Keep doing that until you have completed the rose.
In addition to the rose you just created, you now have enough pieces to complete 3 other roses just by changing up the placement of the colours.
Finally the leaves are completed using the same process and this time I used Always Artichoke and Wild Wasabi.
I will make a video of the process. Sometimes pictures are better than words.
Try the Rose Stained Glass Technique for yourself and have fun. If you have questions, please leave me a comment and I will respond.


