Needlepoint Nook Stamps Easy Way To Get the Look
Needlepoint Nook Stamps Easy Way To Get the Look
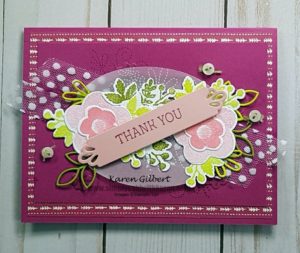
In the 2019 Occasions Catalogue, you will find the Needlepoint Nook Suite. This suite gives you the ability to create cards, scrapbook pages and 3-D projects that resemble real needlepoint. Now, you can finish the look in no time at all.
Recipe
Stamps: Needle & Thread.
Ink:Lemon Lime Twist, Flirty Flamingo, Old Olive, Berry Burst.
Paper: Whisper White, Berry Burst, Vellum, Blushing Bride, Old Olive, Lemon Lime Twist, Needlepoint Nook Designer Series Paper.
Accessories: Big Shot Die Cutting Machine, Needlepoint Elements Framelits Dies, Layering Ovals Framelits, Needlepoint Nook Mini Buttons, Old Olive Linen Thread, Whisper White 5/8″ Polka Dot Tulle Ribbon.
How To
- Card Base – Berry Burst – 5-1/2″ x 8-1/2″ scored at 4-1/4″, DSP Layer – 5-1/4″ x 4″. Berry Burst layer – 5″ x 3-3/4″, Vellum – 4″ x 3″, Scraps for Leaves and tiny flowers, Blushing Bride – 3-3/4″ x 3/4″, Whisper White – 3″ x 3-3/4″.
- Stamp the Needlepoint (the one with dashes) on the Berry Burst layer with Berry Burst ink. With Flirty Flamingo ink, stamp the flowers – stamp off once for the large flowers, stamp at full strength for smaller flowers. Stamp some leaves with Lemon Lime Twist ink and Old Oliver ink on Whisper White cardstock.
- Die cut using the matching framelits to die cut the flowers and the leaves. Stamp the tiny flowers with Berry Burst ink on Berry Burst cardstock. Die cut the tiny flowers and some other open leaves with the die cuts.
- Die cut the oval from Vellum paper with the 2nd largest oval. Emboss the needlepoint on the Vellum with the embossing framelit.
- Stamp the “Thank you” sentiments on Blushing Bride cardstock with Flirty Flamingo ink. Die cut with the rectangle label.
Put The Card Together
- Arrange the various elements on the Vellum. When the arrangement is pleasing to your eye, attach with Multipurpose Liquid Glue, Mini Glue Dots and Stampin Dimensionals.
- Cut 2 pieces of the Polka Dot Ribbon – 5-1/2″ each and attach to back of the vellum oval and then attach to the Berry Burst Layer. Randomly attach the tiny Berry Burst Flowers with Mini Glue Dots, tie a piece of Old Olive Linen Thread to 3 Needlepoint Nook Mini Buttons attach with Mini Glue Dots.
- Layer and adhere the focal panel on the DSP and then on the card base.
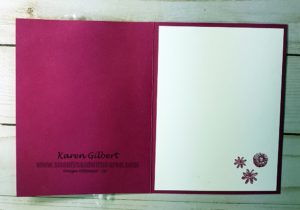
Finally, stamp 3 tiny flowers on the Whisper White panel and attach the panel to the inside of the card. Add a handwritten note or a stamped sentiment.
If you want to recreate this card with the Needlepoint Nook Stamps, you can purchase the supplies from my ONLINE STORE.


