Merry Moose Celebrates Christmas In July – Get Started on Your Cards
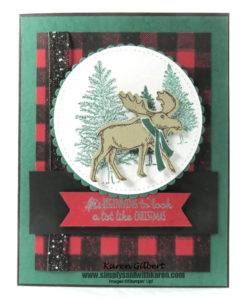
Merry Moose celebrates what is coming in 5 months today. Yes, we are over halfway through the year, so now is a great time to start your Christmas and Holiday cards.
The 2020 August to January Mini Catalogue includes favorite products from last year’s Holiday catalogue. So, if you missed out then, you can purchase them this year.
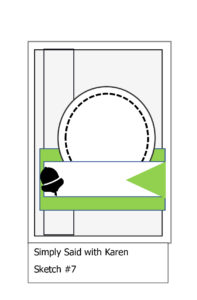
This card is based on a Card Sketch that I posted on my Facebook Page .
The sketches help with your MOJO when you are looking for inspiration. When you check out my Facebook Page, be sure to “LIKE” it so that you get notifications when something is posted.
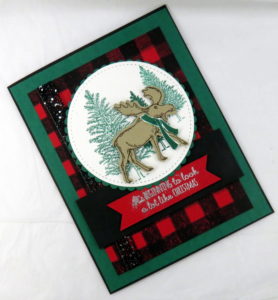
The Merry Moose Bundle is one of the returning faves from last year. 
Merry Moose Christmas
Stamp Sets: Merry Moose, Buffalo Plaid.
Ink: Tuxedo Black Memento, Early Espresso, Shaded Spruce, VersaMark.
Paper: Basic Black, Shaded Spruce, Real Red, Crumb Cake, Whisper White.
Accessories:Emboss & Die Cutting Machine, Stamparatus, Layering Circle Dies, Stitched Shape Dies, Moose Punch, Banner Triple Punch, 3/8″ Black Glittered Ribbon, Silver Stampin’ Emboss Powder.
Details to Create the Card
Cardstock and Cutting Dimensions
- Basic Black – 8-1/2″ x 5-1/2″, scored at 4-1/4″ and folded, 1/2″ x 5-1/4″.
- Shaded Spruce – 5-3/8″ x 4 -1/8″, 3-1/2″ x 3-1/2″-
- Real Red – 3-3/4″ x 5″, 4″ x 3/4″.
- Whisper White – 3-1/2″ x 3-1/2″, scraps for scarf.
Create the Card
- Ink the Buffalo Plaid stamp with Tuxedo Black ink and stamp on the Real Red cardstock. TIP:Because this is a large stamp, I find it easier to use the Stamparatus. I also start with a larger piece of cardstock (larger than I need). Even though I do my best to stamp a straight image, it never seems to work out and I need to trim my paper before applying to card base.
- Attach a 7″ length of the black ribbon to the panel’s left side and attach to the Shaded Spruce cs.
- Adhere both panels to the Basic Black card base.
- Now, cut the scalloped circle from the Shaded Spruce cs using the second largest scalloped circle from the Layering Circle Dies. Cut Whisper White cs using the largest circle from the Stitched Shapes Dies.
- Use the small tree and stamp with Shaded Spruce ink in the middle of the WW circle. Move the stamp to the right and up, and without inking stamp another tree.
- Ink the large tree with Shaded Spruce ink and stamp off once on a piece of scrap paper and stamp on the left of the middle tree. TIP: this treatment adds dimension to a flat piece of paper.
- Stamp the moose with Early Espresso ink on Crumb Cake cardstock. Use the Moose Punch to punch out moose. With Shaded Spruce ink, stamp the scarf on WW cc and fussy cut with your Paper Snips.
- Attach the smaller Basic Black panel across the bottom of the plaid. Stamp a greeting on the Real Red cs with the VersaMark, sprinkle silver emboss powder on the stamped words and heat emboss with heat tool.
- Punch with Banner Triple Punch. Attach over the Black cs.
- Layer the focal image on the scalloped circle and attach over the plaid with Stampin’ Dimensionals.
How to Order
Good for you for creating a Christmas card. Do 1 a week and you may have enough for friends and family by the time that the holiday season rolls around.
The Merry Moose Celebrates Christmas will be a joy to all those that receive it.
You will be able to purchase this set starting August 4, 2020. In the meantime, ordering is open on my ONLINE STORE for other items from the 2020-2021 Annual Catalogue. Don’t forget it’s Bonus Coupon time! Earn a $6.00 coupon for every $60.00 spent on product. Use the coupons in August 2020, when the new Mini Catalogue will be live.


