Demonstrator Training Blog Hop Feb 2023- Playing in the Rain
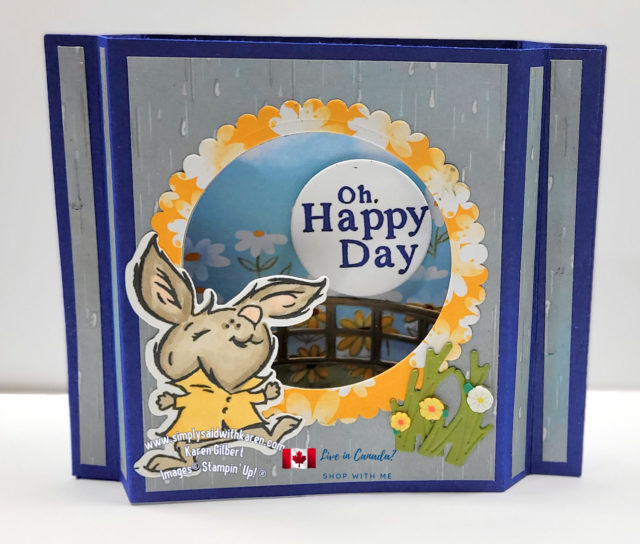
It’s time for the monthly Demonstrator Training Blog Hop. I am featuring the Playing in the Rain Bundle (stamp & dies). As a kid, did you play outside and sometimes in the rain. There was nothing better than stomping through mud puddles in your mud boots.
At the bottom of this post, you will find a list of the blogs taking part. Give them some love by clicking on the links….
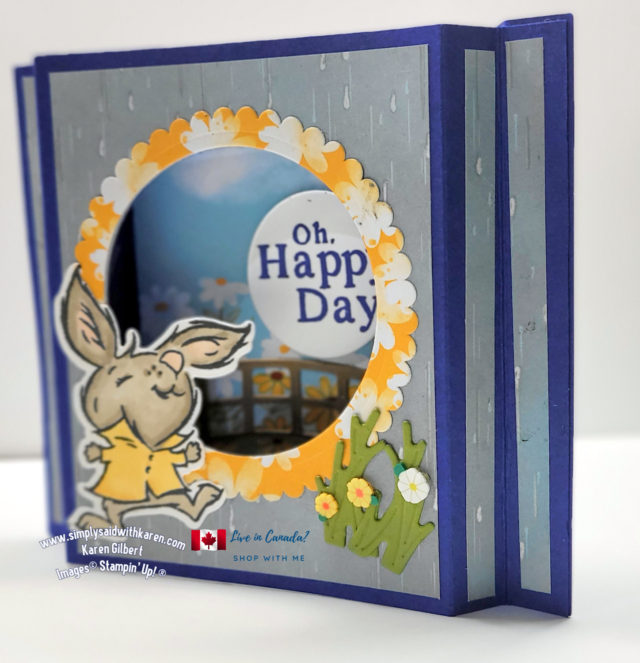
Playing in the Rain Card Recipe
Stamps: Playing in the Rain.
Ink: Tuxedo Black Memento, Night of Navy, Crumb Cake, Stampin’ Blends: Crumb Cake Combo, Mango Melody Combo, Petal Pink Combo, Old Olive Light, Daffodil Delight Light, Color Lifter.
Paper: Starry Night, Crumb Cake, Old Olive, Basic White, Rain or Shine Designer Series Paper.
Accessories: Loose Daisy Embellishments,
NOTE: This card fits a medium sized white envelope.
Basic Supplies:
Tools:
Playing in the Rain Dies
Layering Circle Dies
Clear Blocks B, C D and E or save 10% with the Clear Block Bundle (118491)
Stampin’ Cut and Emboss Machine.
Paper Trimmer
Blending Brush
Bone Folder
Multipurpose Liquid Glue
Stampin’ Dimensionals
Mini Glue Dots
Simply Shammy or Stampin’ Scrub
Stampin’ Mist Stamp Cleaner
Cutting Measurements
Starry Night 8-1/2″ x 11″ With the 11″ side along the top edge of the Paper Trimmer. Cut at 5-1/2″. You now have 2 pieces of card stock measuring 4-1/4″ x 5-1/2″. Score along the 5-1/2″ side. Score at 1/2″ and 1″. Flip cardstock and do the same on the other side. Fold the1st score line into a valley fold and the 2nd one into a mountain fold. Do exactly the same to the other panel. Burnish the folds with the Bone Folder
Rain or Shine Designer Series Paper, (I used the design with the pearlized rain falling) 3-1/4″ x 4″ . From the same design cut, 4 strips at 4″x 1/4″..For the 2nd DSP pattern, (I used the design with the row of daisies and the blue sky with clouds) – 3-1/4″ x 4″ TIP: You may have the play with the paper to decide which scene you would like to show.
Circle Border: Daisy Pattern from the DSP -3-1/2″ x 3-1/2″
Basic White for back panel – 3-1/4″ x 4″, scraps for sentiment, & bunny,
Old Olive – scraps for grasses.
Instructions:
-
- Attach the larger DSP panel to the card front and the strips to the side panels.
- Use the 3rd largest circle and center on the card front and die cut. Save the cutout for another project.
- Use the largest scalloped die from the Layering Circles Die and the 2nd largest circle, nest them on the DSP and die cut. Add touches of Multipurpose Liquid Glue and attach around the circle opening.
- Stamp the rabbit on a piece of Basic White with Tuxedo Black Memento ink. Color with Stampin’ Blends shading where necessary. Use the Color Lifter to add more touches of shading. Die cut with matching die.
- Die cut 2 leaves from Old Olive cardstock..
- Stamp the sentiment on a piece of Basic White in Starry Night ink. Die cut with 3rd smallest circle die.
- Cut the bridge from Crumb Cake cardstock. Use a Blending Brush with Crumb Cake ink to add color to the bridge.
- Attach the inside panel with Multipurpose Liquid Glue
- Attach the sentiment to the inside panel with Multipurpose Liquid Glue.
- Use Tuxedo Black ink and stamp Basic White back panel with the group of daisies. Colour with Stampin’ Blends. Die cut a folded umbrellas from the dsp with the coordinating die.
- With Multipurpose Liquid Glue, attach the umbrellas alongside the daisies. Attach the panel to the back of card.
- Add Multipurpose Glue to the front outside strips and attach to the back outside strips.
- Attach the rabbit to the card front on the lower left side of front circle. Use Stampin’ Dimensionals and attach to the rabbits left side. Use dimensionals to attach the grasses on the front right side of circle.
Enjoy the monthly Demonstrator Blog hop featuring the Playing in the Rain Bundle.
Want to create this card and need supplies? SHOP MY ONLINE store or email me and I can submit your order.


