3 Tips to Create Your Christmas Cards Early.
Create Your Christmas Card Early This Year.
Create your Christmas cards early this year and don’t say “I ran out of time and didn’t sent Christmas cards”. Let me share 3 tips so that won’t happen.
Tip #1
Starting October 4th, I will sent out 12 weekly email titled 12 Weeks of Christmas to email subscribers. These emails will consist of 1 project (cards, gifts, tags and wraps). There will be a supply list for each project and instructions so that you can create these projects. But you need to be on my email list by October r4 at 1;00pm.
To subscribe to my email list, use this LINK. You will also receive welcome gifts for subscribing.
Tip #2
Each year, I run a Christmas card class. We make 8 cards – 2 cards of 4 different designs. This class happens November 16th – 18th. There are 4 classes to choose from so there should be 1 that you could attend.
Schedule – Thursday, November 16th, Friday November 17th and Saturday November 18 starting at 12:30 pm. On Friday November 17th, there is an evening class starting at 6:30pm.
Don’t miss these classes. Check out the details on this class and you can sign up by going to this LINK.
Tip #3
Finally, visit my BLOG on a regular basis for Christmas cards. There are pictures and information on how to recreate the card. There will be at least 2 Christmas cards per week starting November 1st.
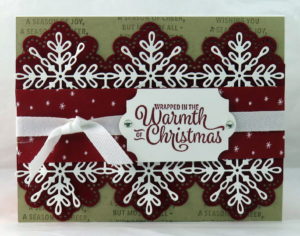
To get your creative juices flowing, here is a Christmas card that you can recreate.
Recipe
Stamps: Snowflake Sentiments.
Ink/Marker: Cherry Cobbler, Crumb Cake.
Paper: Thick Whisper White, Whisper White, Crumb Cake, Cherry Cobbler, Be Merry Designer Series Paper, Adhesive Sheets.
Accessories: Big Shot, Swirly Snowflakes Thinlit Dies, Everyday Label Punch, Metallic Enamel Shapes, Whisper White 3/8” Classic Weave Ribbon.
A Few Details
- Ink the one of the sentiment stamps with Crumb Cake and stamp a number of times on the Crumb Cake card base.
- Die cut 2 of the snowflake background from Cherry Cobbler cardstock.
- Die cut 2 snowflakes from Whisper White card stock. There is a border on both of these thinlits so you can determine how much you want below the snowflakes. Adhere the snowflakes to the snowflake backgrounds.
- Adhere the mounted snowflakes to the Crumb Cake base.
- Attach a strip of designer series paper in the middle of your card. Attach a piece of ribbon to the center of the paper.
- Lastly, ink up a sentiment stamp with CHerry Cobbler and stamp on Whisper White cardstock. Punch out with the Everyday Label Punch. Attach to the card with dimensionals.
Wahoo! One card done!
Use these tips and create your Christmas cards early this year.
If you have any questions, I am as near as your email. karen@simplysaidwithkaren.com


