Blackout Embossing Technique Inspiration In Ink Blog Hop
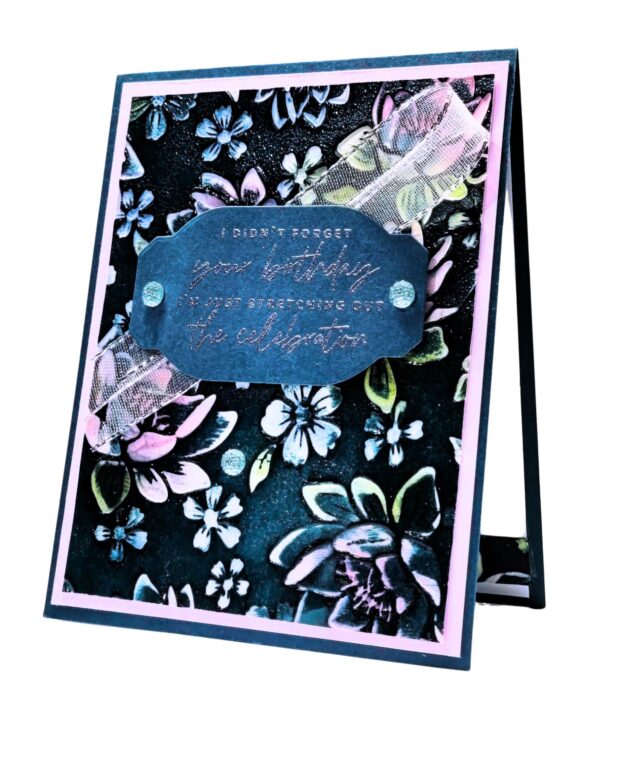
The Blackout Embossing Technique makes a stunning and beautiful card. If it’s the last Wednesday os the month, It’s time for the monthly Inspirations in Ink Blog Hop. We hope you will join us in the hop to other member’s blogs to see what they have for you. The list of the participants is below, so just click on the link and you will immediately be taken to their blog post.
While you are there, please leave some love for them.

The Embossing Technique Card Recipe
SUPPLIES
Stamps: Something Fancy
Ink:Bubble Bath, Pretty Peacock, Azure Afternoon, Soft Seafoam, Old Olive, VersaMark
Paper: Pretty Peacock (4-1/4″ x 11″) , scrap, Bubble Bath, (4″ x 5-1/4″) Whisper White (3-3/4″ x 5″, Inside Panel – Whisper White – (4″ x 5-1/4:).
Accessories: Silver & White 1/2″ ribbon-8″.Faceted Gems Trio Pack, Metallic Wow Emboss Powder (silver).
Tools: Blending Brushes, Stampin’ Cut & Emboss Machine, Layered Floral 3D Emboss Folder, Something Fancy Dies, Heat Tool
Basic Supplies: Paper Trimmer, Bone folder, Paper Snips, Take Your Tool Pick, Stampin’ SEAL+, Multipurpose Liquid Glue, Stampin’ Dimensionals, Mini Glue Dots, Tear & Tape Adhesive
INSTRUCTIONS
Debossed & Coloured Panel
This technique uses the debossed side of the cardstock. That is, the indent of the images. Usually, we work on the bumpy side or the embossed side.
- Emboss the Basic White panel with the Layered Floral 3-D Emboss Folder and the Stampin’ Cut & Emboss Machine.. Work on the debossed side. (The deboss side is when the design is depressed or pushed down.
- Use the Blending Brushes and brush various ink colour into the depressions.On this card, I used Bubble Bath, Azure Afternoon, for the flowers and Old Olive and Soft Seafoam, for the leaves.(make sure that there is sufficient ink in the divots.
- Once you are satisfied with the coverage, take an ink pad in a dark colour, start at the top of the panel and pull down to lay the ink on the embossed panel. (Make sure that you have your ink pad well inked.)
- Make sure the ink is dry before you put the VersaMark on the front panel. Cover the front panel with VersaMark in the same way you did the ink.Emboss with Clear Emboss powder as this will give the front panel a shimmer. Sprinkle on Clear Emboss Powder and heat set with Heat Tool Once the clear emboss powder is dry, you can assemble the card.
Assemble the Card
- Fold the Pretty Peacock card base along score line and burnish with Bone Folder.
- Trim The Embossed Panel to 3-3/4″ x 5″. From the leftover Cardstock, cut a strip that is 1/2″ x 4″ and attach to the inside Basic White panel.
- Attach the Bubble Bath cardstock to the card base, and the embossed panel to the Bubble Bath panel.
- Loop the ribbon and attach to card front with Tear & Tape Adhesive.
- Stamp a sentiment on a scrap of Pretty Peacock cs. Sprinkle with Silver Emboss Powder and heat set with Heat Tool.
- Die cut with a die from the coordinating dies, Something Fancy. Attach with Dimensionals over the ribbon. Attach 2 gems at each end of the die cut.
- Attach the inside panel with adhesive.
I hope you enjoy this card as much a I did when creating it for you.
Please leave a comment below. Comments help me to gain Blog visitors.
Please click on the links below to visit the other Blogs for some inspiring cards. Thank you for joining us.
If you have any questions regarding this technique, please contact me at karen@simplysaidwithkaren.com
If you need supplies to create this technique and card, please SHOP WITH ME


Beautiful card Karen!! Love this technique!!!