Add Texture to Handmade Greeting Cards
Add Texture to Your Greeting Cards
When you add texture to your greeting cards, you add interest. Texture can turn any plain piece of cardstock into a thing of beauty and something very special.
Here are 5 ways that you can make your greeting cards special when you add texture:
- Embossing: Embossing folders are very simple to use and come in many different designs. You insert the plain cardstock into the folder, run through a die cutting machine such as a Big Shot and remove the card stock. What you will have is a raised design on one side of your card stock and a recessed design on the other. You decide what effect you want to achieve. You can use heat embossing to your card. Heat embossing makes use of your stamps. Ink a stamp with Versamark and stamp the image on your cardstock. The image will look like a watermark and can be used on many different types of paper. Sprinkle embossing powder on the image and heat it with a Heat Tool. The heat melts the embossing powder and raises the images on your paper.
- Embellish: Add different embellishments to your card. There are so many interesting items out there. How about buttons, rhinestones, enamel dots. Anything that draws the eye up from the flatness of the card will add texture.
- Framelits/Thinlits: Framelits and thinlits add texture by again raising the element off your card giving it texture. Framelits and thinlits die cut shapes and stamped images. To fool the eye even more, add dimensions to attach them your card.
- Stamping Ink: You are probably thinking why adding stamping ink will create texture. Again this fools the eye. What you are doing is creating a background with ink and a stamp. Stamp a single stamp over the card until the stamp has no more ink.
- Texture Paste: If you have ever done mixed media art, you are likely familiar with texture paste. By using a spatula and spreading the texture paste on card stock, you will have texture. The trick here is to not smooth out the paste but leave bumps and flat spots. An easy way to do this is by using a stencil.
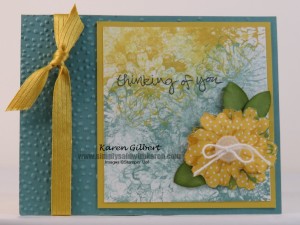
Here is a Sympathy card I created for a friend and yes, there is texture.
Recipe
Stamps: Choose Happiness, Sheltering Tree.
Ink/Markers: Lost Lagoon, Hello Honey, Old Olive.
Paper: Whisper White Thick, Lost Lagoon, Whisper White, Hello Honey, Old Olive, Going Places DSP.
Accessories: Big Shot, Softly Falling Embossing Folder, Hello Honey 3/8” Stitched Ribbon, 1” Circle Punch, Paper Snips, Whisper White Baker’s Twine, Neutrals Designer Buttons.
To create texture on this card, I used:
- Stamps and ink using the SMACKDOWN Technique. This is a really fun technique and you will want to use it over and over. Ink up a stamp in a colour that coordinates with the other colours on your card. I used Lost Lagoon and Hello Honey and the flower stamp from the Choose Happiness stamp set. Ink the stamp with your chosen colour and start stamping in small movements until there is no ink left on the stamp. Fill in the card stock to that there is very little of the cardstock showing. The key is to use a stamp that is not solid and has a design that will show even after stamping multiple times.
- The Softly Falling embossing folder on Lost Lagoon card stock.
- The Hello Honey 3/8″ Stitched Ribbon
- The button with the Baker’s Twine strung through and button, tied in a bow and mounted in the center of the flowers.
I would love to see how you add texture to your cards. Leave me a comment.
Product List


