
Botanical Layers Bundle on the Last Chance List
Botanical Layers Bundle on page 93 of the 2022-23 Annual Catalogue is on the the Last Chance List. It is the bundle that is discontinued, however the stamp set will be in the new catalogue.
But, you still have a chance to get the the vellum paper that is part of the bundle.
Botanical Layers Recipe
Stamps: Botanical Layers, Various Sentiment Stamps
Ink: StazOn Jet Black, VersaMark, Polished Pink, Daffodil Delight, Orchid Oasis, Starry Sky, Fresh Freesia, Evening Evergreen, Rich Razzleberry.
Papers: Polished Pink, Rich Razzleberry, Basic White, Awash in Beauty Designer Series Paper, Coastal Cabana, Lovely Layers Vellum.
Accessories: Stampin’ Cut & Emboss Machine, Fern 3-D Embossing Folder, Deckled Rectangles, Double Oval Punch, Coastal Cabana Sheer Ribbon (Discontinued), Fresh Freesia, Open Weave Ribbon, Starry Night Metallic Woven Ribbon, Stampin’ Emboss Powders (white)
Basic Supplies:
Bone Folder
Stampin’ Seal+
Tear & Tape Adhesive
Stampin’ Dimensionals
Simply Shammy or Stampin’ Scrub
Stampin’ Mist Stamp Cleaner (153648)
StazOn Cleaner
Grid Paper or Small Grid Paper
Paper Snips
Paper Trimmer
If you don’t have the Lovely Layers Vellum, you can use StazOn Ink to stamp images on Vellum. Just let the ink dry before attaching to cardstock as vellum does not absorb the ink.
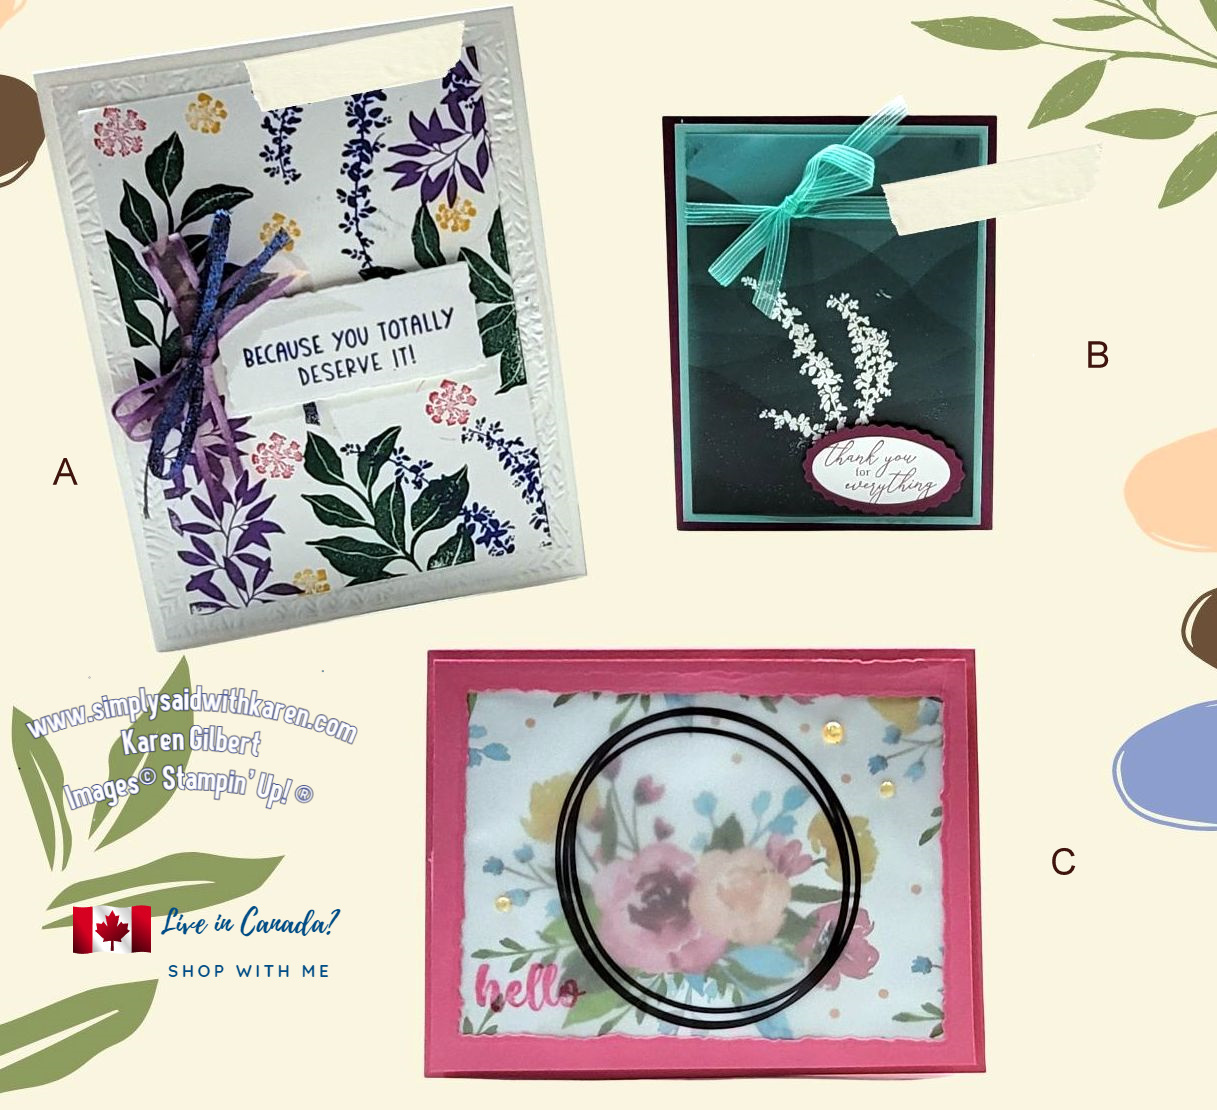
A Card
- Whisper White card base is 8-1/2″ x 5-1/2″ scored at 4-1/4″ and burnished.
- Emboss a Basic White ( cs panel with the Fern 3-D embossing folder.
- On a piece plain of 3-3/4″ x 5″ Vellum, stamp various leaves, blushes & twigs with Orchid Oasis, Evening Evergreen, Fresh Freesia and Starry Night inks. See image for placement. Attach to a Basic White panel (cut 3-3/4″ x 5″) with Glue Dots on the 4 corners.
- Stamp a sentiment on a scrap of Basic White cs. Die cut with the smallest Deckled Die
- Tie 2 bows with the Starry Night ribbon and the Fresh Freesia Ribbon. Stack one on top of the other with Glue dots and tuck behind the sentiment panel.
B Card
- Rich Razzleberry card base is 8-1/2″ x 5-1/2″ scored at 4-1/4″ and burnished.
- Stamp a vellum panel with the twig stamp using VersaMark. (Use the one with gray & black design.. Emboss with White Emboss Powder and heat with Heat Tool. If you don’t have the Lovely Layers Vellum, then color the vellum with different colors of dark ink with a Blending Brushes.
- Coastal Cabana cs panel 4″ x 5-1/4″
- Attach this layer to the Coastal Cabana cs layer with Glue Dots in the 4 corners. Tie the Coastal Cabana Sheer Ribbon around the 2 layers and attach to the card base.
- Stamp a sentiment on Basic White with Rich Razzleberry ink and punch with the smooth edge punch. Use the Scalloped Edge punch and punch an oval from Rich Razzleberry cs scraps. Attach the white oval to the Rich Razzleberry with Seal+ and attach to card base with Dimensionals.
C Card
- Card Base is Polished Pink cs 8-1/2″ x 5-1/2″ score at 4-1/4″ and fold.
- Die cut a panel of Polished Pink cs – 4-1/4″ x 5-1/2″. Use 2 largest Deckled Dies and nest them on the cs panel to form a frame.
- Cut a piece of Designer Series Paper at 3-3/4″ x 5″. Use a vellum panel that has an image (lop-sided circle) or make your own. Attach to the DSP with Glue Dots in the 4 corners of the vellum.
- Stamp the sentiment on the Vellum with Polished Pink Ink. Again let dry or use the Heat tool.
- Place Stampin’ Dimensionals on the Polished Pink frame and attach to Vellum panel.
- Attach embellishment dots to the card front.
So, if you want to try these techniques on Vellum then you can purchase the Botanical Layers bundle on my ONLINE Store.
You can view the Last Chance products by using this LINK
If you have any questions, you can contact me at karen@simplysaidwithkaren.com